11 Apr 2017
Two-factor authentication is generally seen as the golden solution to all security problems. At least that's what I heard.
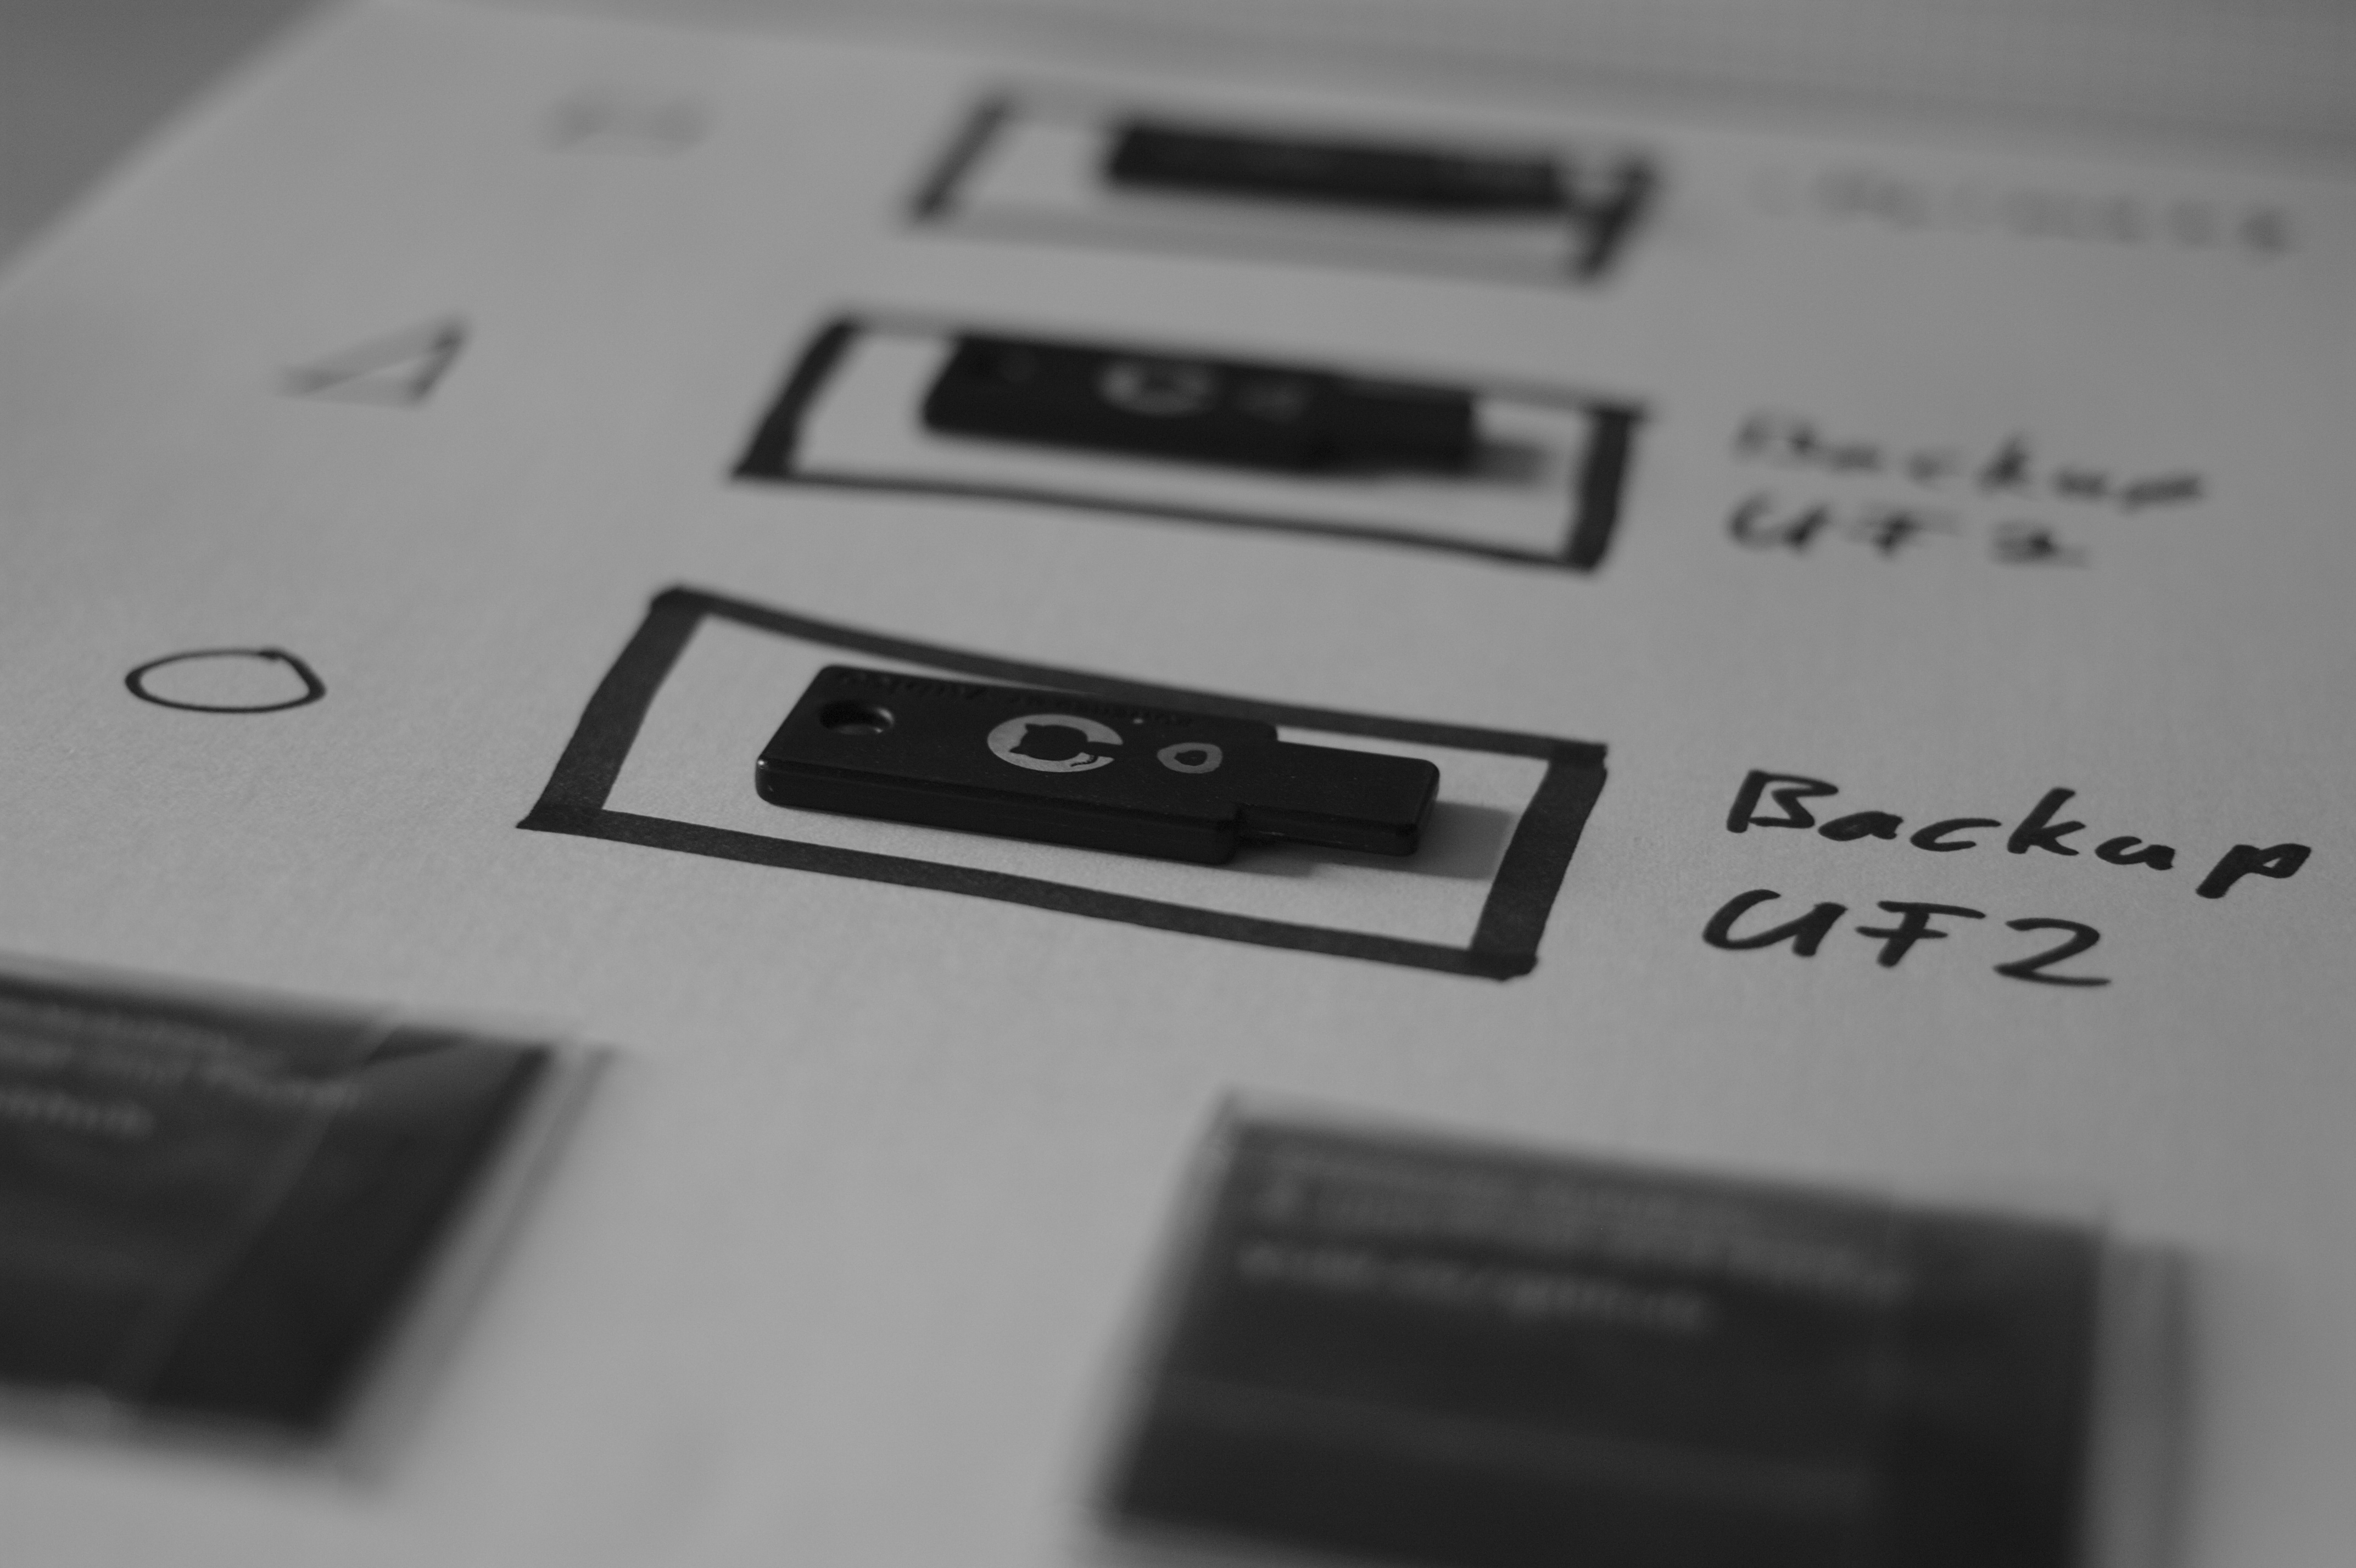
So when Github sold U2F YubiKey I bought one.
This is now 1.5 years ago, obviously I tried to use it, but the U2F YubiKey didn't work. Later I even bought an YubiKey NEO
which I played around a bit but I also failed to get it working. Maybe I was just to stupid maybe my browser was to old or something else.
If you don't know what 2FA is here is the wikipedia definition:
Two-factor authentication (also known as 2FA) is a method of confirming a user's claimed identity by utilizing a combination of two different components. Two-factor authentication is a type of multi-factor authentication.
Or as I like to describe it something you can forget and something you can lose.
And since all the cool kids still use 2FA I thought I could try that again.
And it worked surprisingly well. So I tested it with Github and the Chrome Version 57.0.2987.133 (64-bit) on my Fedora desktop. The first step is to enable 2FA and add the Google Authenticator. Then you should print/backup your recovery key. Now we are almost done and we can name our Key by simply clicking on 'Register new device' and touching the YubiKey device.
Which didn't worked since neither my user nor my group had access to the hidraw device which the YubiKey is.
So to fix this I added a simple udev rule (you should change l33tname to a group your user is in):
sudo echo 'KERNEL=="hidraw*", SUBSYSTEM=="hidraw", MODE="0664", GROUP="l33tname", ATTRS{idVendor}=="1050", ATTRS{idProduct}=="0113|0114|0115|0116|0120"' > /etc/udev/rules.d/70-u2f.rules
With this everything worked flawless. So I thought it would be cool if that also works in Firefox (Firefox 52.0 (64-bit)).
Firefox itself doesn't support U2F but there is a plug-in for it the: u2f-support-add-on.
Update: Firefox works with U2F by default (and the plugin seems to be gone):
The latest version of Firefox supports FIDO2 and U2F keys:
FIDO2 has been supported since version 66.0.32.
U2F has been supported since version 57, but only enabled by default from version 68 onwards.
source
And now U2F works also in Firefox.
| service |
Phone number required |
U2F support |
| github |
no |
yes |
| twitter |
yes |
no |
| tumblr |
yes |
no |
| google |
yes |
yes |
So of the services I tested only Github does what I want. I can connect the google authenticator as backup 2FA and can use my YubiKey as primary 2FA.
Google is also not bad since you need the phone number only to enable 2FA. But Google doesn't allow you to use your YubiKey on Firefox which is annoying.
On the other hand it was super simple to use my YubiKey on Android with NFC. Tumblr has a great blog post about U2F but it's not implemented which is sad.
In conclusion it's simple to use U2F and some services have a good support for 2FA, but there is still a long way to go.
31 Mar 2017
I have been told that the 31.03 international backup day is.
So here is how I backup my server. This solution is based on the solution Dave Eddy has built.
I use zfstools to create the snapshots. Zfstools is a collection of ruby scripts
which are modeled after the automatic ZFS snapshots in OpenSolaris. (source).
So the first step is to install it and enable it on all data sets which should be snapshotted.
pkg install zfstools
zfs set com.sun:auto-snapshot=true DATASET
And we need to add these to our crontab. It should be a user which is allowed to create and destroy snapshots.
This creates snapshots which are looking like this zfs-auto-snap_hourly-2017-03-30-20h00. The -k is to keep 0 sized snapshots, you can remove that
if you don't like it. The second thing is the Interval in which these snapshots are created. And the last one is how many of these types of snapshots are
kept. Here is a good default:
PATH=/etc:/bin:/sbin:/usr/bin:/usr/sbin:/usr/local/bin:/usr/local/sbin
15,30,45 * * * * zfs-auto-snapshot -k frequent  4
0        * * * * zfs-auto-snapshot -k hourly   24
7        0 * * * zfs-auto-snapshot -k daily     7
14       0 * * 7 zfs-auto-snapshot -k weekly    4
28       0 1 * * zfs-auto-snapshot -k monthly  12
Now we have a good local snapshot policy. But our snapshots are only local. To send them offside I use the script zincrsend
which is created by Dave Eddy.
fetch https://raw.githubusercontent.com/bahamas10/zincrsend/master/zincrsend
mv zincrsend /usr/local/sbin
sudo chown root:wheel zincrsend
sudo chmod 555 zincrsend
Now we need to create a remote dataset and setup an ssh server.
sysctl vfs.zfs.min_auto_ashift=12
sudo zpool create -f -O atime=off -O utf8only=on -O normalization=formD -O aclinherit=passthrough -O compression=lz4 tank mirror ada2 ada3
sudo zfs allow -u $USER aclmode,compression,mountpoint,create,mount,receive,jailed,snapdir tank
This creates a the my remote datasets and allows my ssh user to write to it. (source)
Now this is out of our way we can edit zincrsend and add the ssh connection informations.
# information about the server on the receiving end
remote_server='iapetus'
remote_user='l33tname'
remote_port='22'
remote_dataset='tank' # zpool name most likely
remote_command_prefix='' # leave blank for nothing
remote_ssh_opts=(-i /root/iapetus_backup) # additional opts to give to ssh

# prefix to use for snapshots created by this script
snapshot_prefix='zincrsend_'
HINT this can take a very long time depending on your data size and your network speed. Now we can test zincrsend and it should look like this:
processing dataset: tank/movie

creating snapshot locally: tank/movie@zincrsend_1481374186
cannot open 'tank/movie': dataset does not exist
no snapshot found for tank/movie - doing full send/recv
zfs sending tank/movie@zincrsend_1481374186 to tank/movie
receiving full stream of tank/movie@zfs-auto-snap_weekly-2016-11-13-00h14 into tank/movie@zfs-auto-snap_weekly-2016-11-13-00h14
received 1.50TB stream in 15331 seconds (103MB/sec)
receiving incremental stream of tank/movie@zfs-auto-snap_weekly-2016-11-20-00h14 into tank/movie@zfs-auto-snap_weekly-2016-11-20-00h14
received 312B stream in 3 seconds (104B/sec)
.......


script ran for ~526 minutes (31609 seconds)

ok - took 526 minutes

---------------------------------
If that worked we can extend crontab to clean up unused snapshots and send all changes to our offside location weekly.
2        0 * * 7 /usr/local/sbin/zfs-cleanup-snapshots
13       0 * * 7 /usr/local/sbin/zincrsend
That's it do your backups!
25 Jan 2017
It has absolutely nothing to do with pr0n sadly. I build a Web dashboard with some statistics for hardware
testing. Nothing crazy just a bit flask and a bit of python magic. Anyway at some point I thought it would
be cool to add a tab where you can see your test. Since we have IP cameras anyway. Sounds like an fairly easy task to do,
or at least I thought that.
So my first step was to figure out what model of cameras we have and how they work. Of course you don't find a company name
or model number in the web Interface. And the "Quick Installation Guide" is a joke. It's amazing how many pages you can fill with
useless informations. At least on the Camera itself there is a sticker with a model number. At least something you can type in Google
and with a bit searching it turned out that this camera is no longer for sale, but at least I found out how made it. Which is not as
helpful as I thought because Fitivision Technology Inc. are a bit useless. But thanks to that I found a great blog post about a
Zonet ZVC7610 network camera which looks almost
identical to the one I have. The post mentions two urls http://admin:admin@[camera IP address]/cgi/mjpg/mjpeg.cgi and
http://admin:admin@[camera IP address]/cgi/jpg/image.cgi the image url worked fine. But I didn't got the MJPG stream to
display it just started to download a file.
So I looked up how this M-JPEG works. Starting with the wikipedia article, by reading it
I found out that it's probably M-JPEG over HTTP which sounds simple:
In response to a GET request for a MJPEG file or stream, the server streams the sequence of JPEG frames over HTTP. A special mime-type content type multipart/x-mixed-replace;boundary= informs the client to expect several parts (frames) as an answer delimited by . This boundary name is expressly disclosed within the MIME-type declaration itself. The TCP connection is not closed as long as the client wants to receive new frames and the server wants to provide new frames.
Well didn't worked for me, so the next thing I tried was to use the image url and reload it with javascript.
<!DOCTYPE html>
<html>
  <head>
    <script>
		function updateImage() {
		    var image = document.getElementById("img");
		    image.src = image.src.split("#")[0] + "#" + new Date().getTime();
		}
		setInterval(updateImage, 800);
    </script>
  </head>
  <body>
    <img id="img" src="http://admin:admin@[camera IP address]/cgi/jpg/image.cgi#date">
  </body>
</html>
Which works fine. The downside of this is for each request a TCP connection get created, the images is downloaded. Which is very slow.
But cool is that it works cross browser (Firefox/Chrome) at least I thought it would. More on this topic what could go wrong later.
My next step was to analyse how the Camera itself is able to show more FPS than my javascript solution. It's a java applet. But on the other hand
it's really easy to find out what it does. Just download the jar file and open it with JD-GUI. For fun
I created a swing GUI. All the code is on my bitbucket ultracam. It helped me a lot to figure out how you
can decode and display a M-JPG stream. Based on that research I started building a small python parser.
#!/usr/bin/python
# -*- coding: latin-1 -*-

import requests

url = 'http://[camera IP address]/cgi/mjpg/mjpeg.cgi'
r = requests.get(url, auth=('admin', 'admin'), stream = True)

with open("wat", 'wb') as f:
    for chunk in r.iter_content(chunk_size=600):
        if chunk: # filter out keep-alive new chunks
            f.write(chunk)

            #print(str(chunk).find("--myboundary")) # aka --myboundary .index("2d2d6d79626f756e64617279")

            cl_header = int(str(chunk).find("Content-Length: "))
            cl_header = int(cl_header) + len("Content-Length: ") + 5
            print(cl_header)

            shift = 0
            foundFF = False
            foundD8 = False

            for item in str(chunk)[cl_header:cl_header+45]:
                shift += 1

                hexhex = item.encode("hex")

                if hexhex is "ff":
                    foundFF = True

                if hexhex is "d8":
                    foundD8 = True

                if foundFF and foundD8:
                    break

            print(cl_header + shift - 2)
            print(str(chunk)[0:cl_header+shift-2])

            break
It's not really finished but it was fun to play around and extract the jpg images from the stream.
In the process I learned that there is a tool called ffplay which worked fine with the M-JPG stream.
ffplay -f mjpeg -probesize 32 -i http://[camera IP address]/cgi/mjpg/mjpeg.cgi
This got me thinking why does this not work in a browser which lead me to the conclusion that I'm doing something wrong.
With a bit Google magic I found out that you can put a M-JPG stream in a img tag.
<img src="http://admin:admin@[camera IP address]/cgi/mjpg/mjpeg.cgi" />
Well that was too easy. This works fine in Chrome / Chromium (almost). In Firefox it works for a few seconds and then the entire
Firefox crashes, reproducible. And Chrome / Chromium doesn't send the basic auth information if the url is embedded in the img tag.
So for now I use the Firefox with the JavaScript image refreshing method until I figure out what the problem in Chrome is.
In conclusion: you can waste many hours for a simple idea.
20 Jan 2017
I have a problem with my touchpad on my laptop. And to figure out what is wrong I checked dmesg
and found this unrelated problem. And fixing this problem should not hurt.
[ 3290.177993] atkbd serio0: Unknown key released (translated set 2, code 0xbe on isa0060/serio0).
[ 3290.178007] atkbd serio0: Use 'setkeycodes e03e <keycode>' to make it known.
As you can see it sends a unknown keycode which we can map with setkeycodes e03e.
According to the Internet TM this is send every second and tells the OS the orientation of the
Screen. So I mapped it to 255 to do nothing like this: sudo setkeycodes e03e 255.
This solves the problem until the next reboot which is not good enough.
So we create a systemd service file
$ cat /etc/systemd/system/setkeycodes.service
[Unit]
Description=Change keycodes at boot

[Service]
Type=oneshot
ExecStart=/usr/bin/setkeycodes e03e 255

[Install]
WantedBy=multi-user.target
And enable the service:
sudo systemctl enable setkeycodes
11 Jan 2017
This Blogpost describes how you can use your Logitech F710 controller on a Windows 10.
For some reasons the offical Logitech driver doesn't work on Windows 10. But you can just
use the Xbox driver, here is how:
Right click -> Update Driver Software... -> Browse my computer for driver software -> Let me pick from a list of device drivers on my computer -> Xbox 360 Peripherals -> Xbox 360 Wireless Receiver for Windows.
I would have made a short video how this works but Nvidia Shadowplay also doesn't work.