14 Jun 2026
I recently looked at a Nokia Streaming box 8000 which seemed to stuck in a boot loop.
(It's a surprisingly expensive? Android TV box)
My assumption was that a recent software update broke the system so my first course of action was
to reset the unit and see if that fixes the issue.
The reset button is at the bottom and kind of what you would expect:
Perform a HARD Reset of your Nokia Streaming Box. In order to perform the HARD Reset,
a paper clip or a similar object is needed (for example, a SIM Card ejector can also work).
While the Power Cable is disconnected, please press the RESET button, which is situated on the bottom
of the Nokia Streaming Box 8000 and keep it pressed.
While you are keeping the RESET button pressed, please connect the POWER plug and then release the RESET button.
source
After that it stopped booting completely and I just assumed the hardware was broken.
With a bit of googling I found a reddit thread
talking about a uart which peaked my interest.
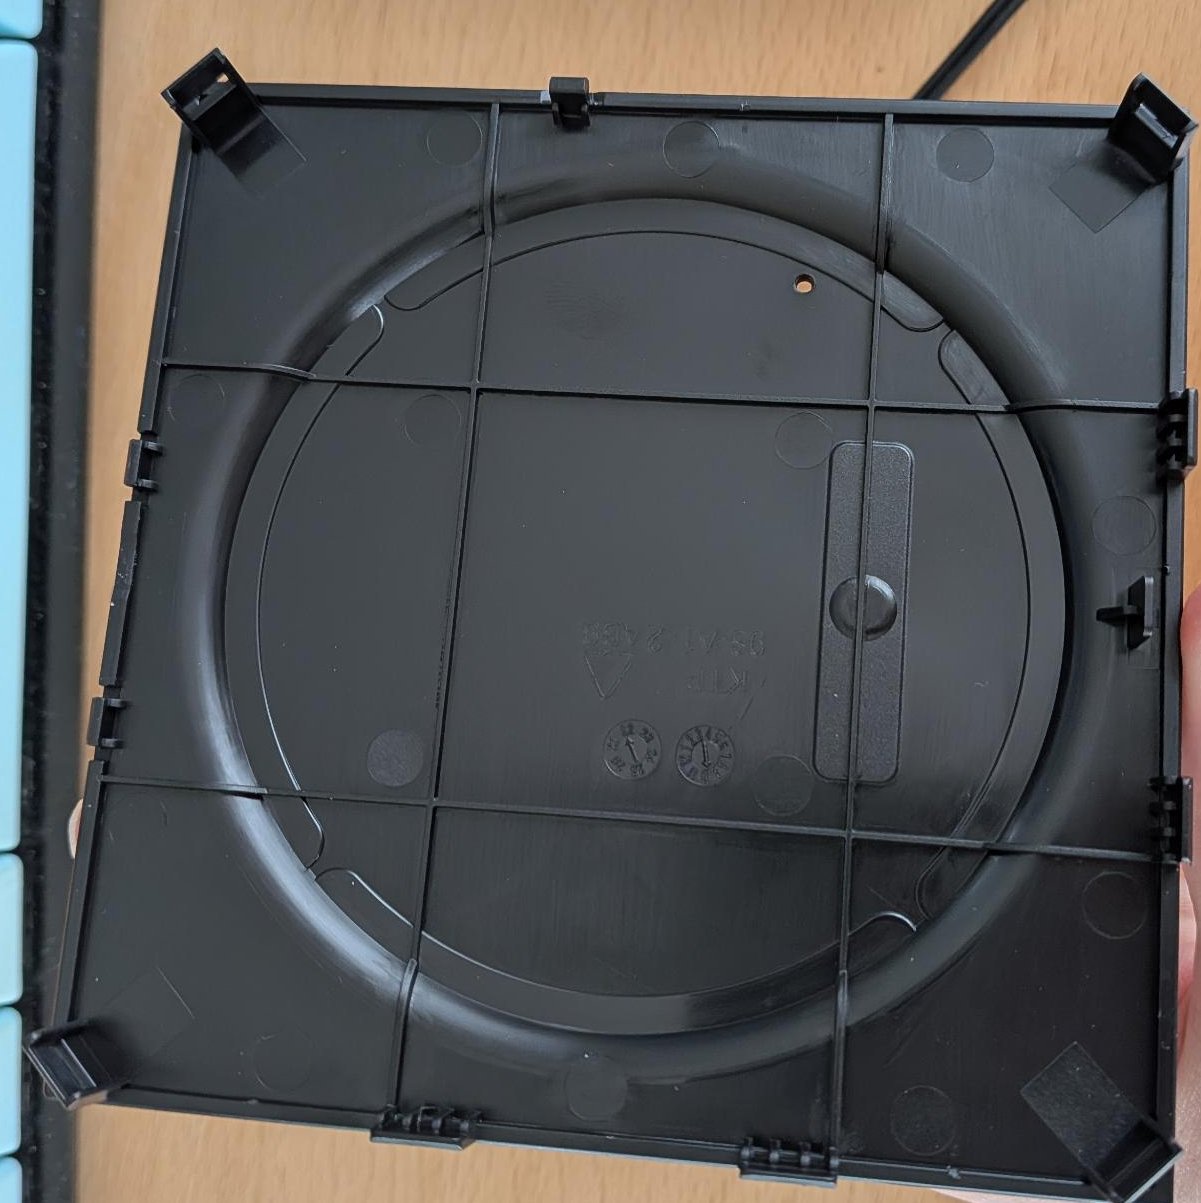
Prying open the device was something I didn't enjoy much but the devices does not have any screws for the case.
And the way in is to pry it open it has 2 taps on the front see this picture of the bottom.
Use the reset hole to orientate yourself.
The good news is I think you are already done I toke it fully out which also takes a little bit more force than I
was comfortable with because it sticks to a thermal pad.
But you can access the uart from the back unfortunately its not labeled there.
I took the picture from the reddit thread and labeled them for you.
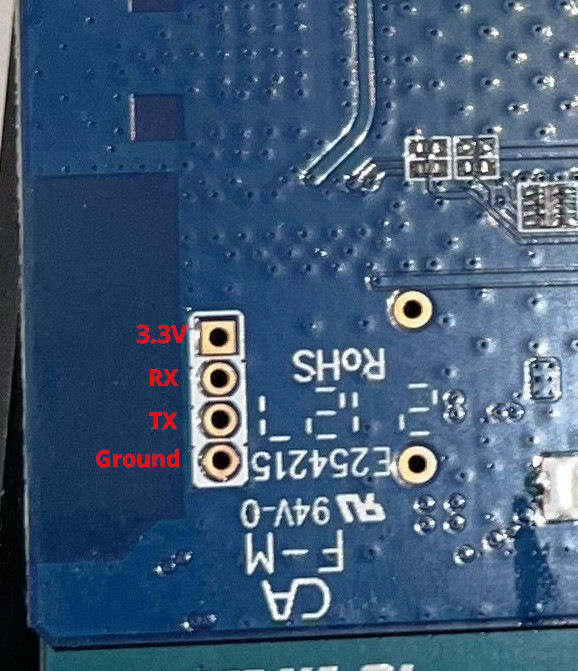
Take your favorite USB Serial TTL and connect ground to ground and don't forget that you need to cross TX/RX.
Meaning TX from the USB adapter goes to RX on the board.
I didn't even bother to solder it on I just stuck some cables in at an angle so they made contact which was enough.
This allows to see the boot process and diagnose your unit.
I used screen /dev/ttyUSB1 115200 (depends a bit on your Serial TTL adapter usual something like ttyUSB* or ACM*) but any serial tool will work.
In my case it seems the provided power supply (which is 12V and 1 amp) did not provide enough
power after switching that to a 1.5 amp unit everything started to work again.
Thanks random reddit user for saving this box from e-waste.
Hopefully it runs a few more years.
22 Feb 2026
NVIDIA in 2026 how bad is it?
Spoiler it's not great.
We all know and love the Linus Torvalds Fuck you NVIDIA clip (2012) but how bad is it these days?
I decided to try it again with my latest Fedora 43 installation.
Before people ask why I even bought a NVIDIA card instead of AMD,
the long story short is I got it almost for free
and I didn't think much about it.
(It's a GeForce GTX 980)
Last time around I stuck with the nouveau driver which is the open source
implementation of a NVIDIA driver.
This works well enough for me to render a browser and some terminals.
I don't have high needs and expectations for my graphic cards.
The main problem for me is that after years it does not seem to have
and controls for the fans so they spin at 100% all the time and make a
lot of noise.
The install
To install the drivers I followed the NVIDIA on Fedora desktops guide.
Which is just these few commands since there is no secure boot on this system:
sudo dnf update
sudo dnf install https://mirrors.rpmfusion.org/free/fedora/rpmfusion-free-release-$(rpm -E %fedora).noarch.rpm https://mirrors.rpmfusion.org/nonfree/fedora/rpmfusion-nonfree-release-$(rpm -E %fedora).noarch.rpm


sudo dnf install akmod-nvidia
sudo dnf install xorg-x11-drv-nvidia-cuda

# wait here until the module is built (the command should show a version)
modinfo -F version nvidia

# reboot
Sway
Since I run sway there are a few more tweaks needed.
The wiki states: "The NVIDIA proprietary driver isn't officially supported here" source.
Support is not great.
I added an /etc/sway/environment file as recommended by the guide above.
SWAY_EXTRA_ARGS="$SWAY_EXTRA_ARGS --unsupported-gpu"
WLR_NO_HARDWARE_CURSORS=1
In addition I needed sway-nvidia.
git clone https://github.com/crispyricepc/sway-nvidia
sudo install -Dm755 sway-nvidia/sway-nvidia.sh "/usr/local/bin/sway-nvidia"
sudo install -Dm644 sway-nvidia/sway-nvidia.desktop "/usr/share/wayland-sessions/sway-nvidia.desktop"
sudo install -Dm644 sway-nvidia/wlroots-env-nvidia.sh "/usr/local/share/wlroots-nvidia/wlroots-env-nvidia.sh"
After that I was able to select Sway (NVIDIA) from the login screen
and boot successfully into sway with the proprietary NVIDIA drivers.
One interesting side effect of the driver changes was that I needed to
run a sudo flatpak update and a re-login before things like Signal
started to work again.
Conclusion
In conclusion: don't get NVIDIA graphic cards in 2026
if you want to run linux.
The open source driver is still not ideal and
the proprietary route is not any better.
(Both got significant better and simpler to use since I tried this experiment ~4-5 years ago.)
04 Jan 2026
I love the fact that nix systems configurations can be stored
in a git repository and then remotely applied via ssh.
There is the good resource in the NixOS & Flakes Book on the topic of remote deployment.
And everyone tells you to use flakes which allows you a more straight forward way to track the used nixpkg versions.
But I was not able to find any good examples of a flake to start out.
Nix people tend to have very convoluted and complicated setups.
As it turns out a minimal config can be very simple:
$ cat flake.nix
{
  description = "Basic system deploy Flake";
  inputs = {
    #nixpkgs.url = "github:NixOS/nixpkgs/nixos-25.11";
    nixpkgs.url = "github:NixOS/nixpkgs/nixos-unstable";
  };

  outputs = inputs @ {
    self,
    nixpkgs,
    ...
  }: {
    nixosConfigurations = {
      systemA = nixpkgs.lib.nixosSystem {
        system = "x86_64-linux";
        modules = [
          ./config.nix
        ];
        specialArgs = {inherit inputs;};
      };
    };
  };
}
The used nixpkgs version is defined in inputs.
I used unstable but you can switch that to a released version.
This is reproducible even for unstable as flakes stores a hash for the used version in flake.lock.
This can and should be updated from time to time with:
nix flake update and nix flake show can show you all the configured targets.
The ./config.nix is just the file you had in /etc/nixos/configuration.nix.
This can now be used to deploy assuming the ssh setup is done correctly.
nixos-rebuild switch --flake .#systemA --target-host example.com
Select a formatter to run nix fmt to format all files in this directory.
This is done by adding a formatter.x86_64-linux.
Example:
...
  }: {
    formatter.x86_64-linux = nixpkgs.legacyPackages.x86_64-linux.alejandra;
    nixosConfigurations = {
      systemA = nixpkgs.lib.nixosSystem {
...
24 May 2025
You might have heard me talk about the new 10Gbit/s setup I'm running.
Plus there is a chance this is the first blog post in the series of:
Nobody intends to build a data center in the basement. 1
How is that possible? Thanks to Fiber7 a product from Init7,
people (like me) have easy access to 1/10/25 Gibt/s.
Before you asks this is symmetrical meaning up and download.
(I decided against 25G because there is no way to saturate
this much bandwidth right now)
Since this is the first blog post in the series lets start with
where the Fiber meets the first device in my network.
Which is the router as you might have suspected.
I went with the CCR2004-1G-12S+2XS which has an awful name
but great hardware for a decent price.
I also looked at the Zyxel AX7501-B1 which had mixed to bad reviews online
and I'm not familiar with the configuration interface.
The other thing I looked into where the different Ubiquiti UniFi Dream Machines
which are probably also nice options.
Due to personal preference I'm not a huge Ubiquiti fan anymore.
And last but no least self build / custom hardware with something like
OPNsense was also an option I considered.
Because OPNsense is amazing and here is the specific hardware I looked at:
In the end I ran out of time and the fact that I can copy & past a lot of
my existing configuration lead to the decision to go with CCR2004-1G-12S+2XS,
and it did not hurt that it is also recommended by Init7 and comes with example config.
My feelings about the UI and UX of RouterOS did not change but it got recently
a new skin so yay progress I guess?
You can read all about that and the IPv6 & OpenVPN setup in previous blog posts:
The Config
Lets go to the config which I could as expected take over a lot from
my previous setup. This makes this setup a mix of my old setup,
the official Init7 example and Michael Stapelbergs config.
(I like to note that I did not run into the Fan issues and DNS slow-downs which Michael had, I assume things improved in the last 4 years)
The core idea is to create 2 bridges one for wan and one for lan like this:
/interface/bridge/add name=lan
/interface/bridge/add name=wan protocol-mode=none

/interface ethernet set [ find default-name=sfp28-1 ] fec-mode=fec91

/interface bridge port add bridge=wan interface=sfp28-1

/interface bridge port
add bridge=lan interface=sfp-sfpplus1
add bridge=lan interface=sfp-sfpplus2
add bridge=lan interface=sfp-sfpplus3
add bridge=lan interface=sfp-sfpplus4
add bridge=lan interface=sfp-sfpplus5
add bridge=lan interface=sfp-sfpplus6
add bridge=lan interface=sfp-sfpplus7
add bridge=lan interface=sfp-sfpplus8
add bridge=lan interface=sfp-sfpplus9
add bridge=lan interface=sfp-sfpplus10
add bridge=lan interface=sfp-sfpplus11
add bridge=lan interface=sfp-sfpplus12
add bridge=lan interface=ether1
Getting network connectivity from the uplink is also simple:
/ip dhcp-client add disabled=no interface=wan
/ip address add address=192.168.XXX.1/24 interface=lan network=192.168.XXX.0

/ipv6 settings set accept-router-advertisements=yes
/ipv6 address add address=XXXX:XXXX:XXXX::1/64 interface=lan
/ipv6 dhcp-client
add add-default-route=yes interface=wan pool-name=v6pool pool-prefix-length=56 request=address,prefix
Setting up DHCP and neighbor discovery for IPv6:
/ip pool add name=dhcp_pool0 ranges=192.168.XXX.XXX-192.168.XXX.XX
/ip dhcp-server add address-pool=dhcp_pool0 disabled=no interface=lan name=dhcp1
/ipv6 dhcp-server add address-pool=v6pool interface=lan name=v6server
/ip dhcp-server network add address=192.168.XXX.0/24 gateway=192.168.XXX.1 domain=XXXX.network dns-server=192.168.XXX.5,192.168.XXX.6
/ipv6 nd
set [ find default=yes ] interface=lan managed-address-configuration=yes mtu=1500 other-configuration=yes dns=XXXX:XXXX:XXXX::5,XXXX:XXXX:XXXX::6
On the firewall side one of the more important things to setup is FastTrack
to utilize the hardware otherwise it's possible that not the full performance can
be utilized. (Needs to be done for v4 & v6)
/ip firewall filter
add action=fasttrack-connection chain=forward comment=FastTrack

/ipv6 firewall filter
add action=accept chain=forward connection-state=established,related in-interface=wan out-interface=lan
And the other thing to setup on firewall side is the NAT for v4.
/ip firewall nat
add action=masquerade chain=srcnat out-interface=wan
Last but not least I want to show how to setup port forwards / open the firewall for
applications that should be available outside lets use the port 32400 (Plex) as an example.
/ip firewall nat
add chain=dstnat dst-port=32400 action=dst-nat protocol=tcp to-address=192.168.XXX.21 to-port=32400 in-interface=wan comment="Plex"

/ipv6 firewall filter
add chain=forward action=accept protocol=tcp dst-address=XXX:XX:XXX::21 dst-port=32400 comment="plex"
And the OpenVPN setup is 1:1 the same as before see the previous blog posts linked
further up this post. I was able to export the certificates and just import them
on the new device. Important note here is to export with password otherwise the
required private key is not part of the export which took me some time to figure out.
/interface ovpn-client
add add-default-route=no auth=null certificate=site-to-site-mikrotik-client \
    cipher=aes256-gcm connect-to=XXX.network disabled=no \
    mac-address=02:40:XX:XX:XX:XX max-mtu=1500 mode=ip name=ovpn-edlibach \
    port=1194 profile=default protocol=tcp route-nopull=no tls-version=any \
    use-peer-dns=yes user=XXX verify-server-certificate=no
Testing
Now that we have our great setup we obvious want to test that and confirm that everything works.
To test IPv6 i like ipv6-test.com and test-ipv6.com click on the site and get feedback.
The other thing is we want to test if we really are able to saturate the full 10G.
A word of advice if you test with something like speedtest.net depending
on your peer you are not able to test the full 10G.
So preferable use something like iperf3 with the official servers,
but there as well be careful as a single client stream can be not enough
to fully get the 10G speed so try with iperf3 --parallel n or -P n for short.
And last but not least no shout-out to netAlly for the LinkRunner® 10G.
Despite marketing which looks like this: Advanced Multi-Gig/10G Cable & Network Tester.
This thing is not really able to test a 10G link to a random endpoint.
Which is weak for a 6000 euro device.
08 Feb 2025
I just updated the blog post Streaming Setup
to install the latest version of Darkice on Fedora 41.
Or you can use the ansible playbook I create for it: functions/darkice.yml