07 Jul 2020
There is this new thing called IPv6.
And with new I mean it is around longer than me.
In the past I used the Hurricane Electric Free IPv6 Tunnel Broker
to get IPv6 connectivity to my networks.
Because my previous providers didn't had native IPv6.
But this changed since I use Fiber7 by Init7.
They support native IPv6 connectivity and if you ask you even get a static IPv6 range.
For free, and thats a great price!
It took forever to configure it on my Router hEX S.
Because I'm very lazy and not because it is very complicated.
A few facts first, my main interface I use is pppoe-out1.
And for this post lets assume the range assigned by Init7 was 2001:XXXX:YYY::/48.
With all the here is how my configuration looks:
/ipv6 dhcp-client add request=prefix pool-name=fiber7 pool-prefix-length=64 interface=pppoe-out1 add-default-route=yes
/ipv6 address add address=2001:XXXX:YYY::1/64 advertise=yes from-pool=fiber7 interface=bridge1
And the firewall configuration I use to protect my router and the hosts in my network:
/ipv6 firewall filter
add action=accept chain=input comment="allow established and related" connection-state=established,related
add chain=input action=accept protocol=icmpv6 comment="accept ICMPv6"
add chain=input action=accept protocol=udp port=33434-33534 comment="defconf: accept UDP traceroute"
add chain=input action=accept protocol=udp dst-port=546 src-address=fe80::/16 comment="accept DHCPv6-Client prefix delegation."
add action=drop chain=input in-interface=pppoe-out1 log=yes log-prefix=dropLL_from_public src-address=fe80::/16
add action=accept chain=input comment="allow allowed addresses" src-address-list=allowed
add action=drop chain=input

/ipv6 firewall address-list
add address=fe80::/16 list=allowed
add address=2001:XXXX:YYY::/48  list=allowed
add address=ff02::/16 comment=multicast list=allowed

/ipv6 firewall filter
add action=accept chain=forward comment=established,related connection-state=established,related
add action=drop chain=forward comment=invalid connection-state=invalid log=yes log-prefix=ipv6,invalid
add action=accept chain=forward comment=icmpv6 protocol=icmpv6
add action=drop chain=forward in-interface=pppoe-out1
This configuration allows to ping my hosts but nothing else.
To allow access via ssh to some specific hosts I would need to add extra rules.
And last but not least here is how you can test ping google from your router:
ping interface=pppoe-out1 address=2001:4860:4860::8844
This is mostly based on Manual:Securing Your Router. And some other sources I consulted in the process:
07 Jun 2020
You might read my blog post about my CPU running to hot
or not then you can do that here.
This incident lead me to investigate the capabilities of my IPMI a bit more.
The Intelligent Platform Management Interface or for short IPMI
is the interface to your BMC.
BMC is the baseboard management controller which is a scary computer in your computer
running a network stack and interface directly with your hardware.
In general I think it is a good idea to keep that stuff in a very protected network segment.
My main interest was to play around with the cooling fan RPM.
Where I didn't really succeeded.
But regardless of that here are two of the things I learn in the process.
I used a MBD-X10SDV-6C-TLN4F-O Mainboard and installed the ipmitool package on FreeBSD.
Reset user password
The first thing is I set a password and apparently I typed it wrong twice.
Not sure how that can happen but it did.
And here is how to undo that:
sudo ipmitool user list
sudo ipmitool user set password 3 PASSWORD
List the users and set an new password. (In this case the new password would be PASSWORD)
In my case the user had the id 3.
Reboot BMC
And the second thing I learned how to reboot the BMC
independent from the computer itself.
The issue I had was that a fan failure (me short circuiting the pwm pin of a fan)
put all other fans to 100%.
Turns out, this is annoyingly loud.
As we learned in the intro the BMC is just a computer,
meaning we can reboot just like a computer (interdependently for the server).
sudo ipmitool mc reset warm
The important bit here is warm.
If you use cold it would restart your server as well.
Resources
Here are a few resource in no particular order I consulted.
24 May 2020
I had the issue that my Plex Transcoding started failing after I watched some Movies.
After some debugging and guessing I think the issue is the CPU Temperature.
So here is quick way to check on the CLI how the CPU is doing every 2 seconds:
(At least on FreeBSD)
while true; do sysctl dev.cpu | grep temperature; sleep 2; ; done
This is handy to debug and look at the CPU Temperature.
But that is not a way to constantly monitor forever.
So I packed this logic into my telegraf.conf like this:
[[inputs.exec]]
  commands = ["sh -c 'sysctl -n dev.cpu.0.temperature | tr -d C'"]
  name_override = "cpu_temp"
  timeout = "5s"
  data_format = "value"
  data_type = "float"
  [inputs.exec.tags]
    core = "core0"

[[inputs.exec]]
  commands = ["sh -c 'sysctl -n dev.cpu.1.temperature | tr -d C'"]
  name_override = "cpu_temp"
  timeout = "5s"
  data_format = "value"
  data_type = "float"
  [inputs.exec.tags]
    core = "core1"

....
As you can see there is a inputs.exec for each CPU core.
Which can result in a grafana dashboard.
Here is the one I built:

The code for that is for your convenience in this gist.
Probably a few things need to be adjusted.
For example host.domain.tld needs to match your hostname sent by your telegraf configuration.
But this will not solve the issue of the CPU running to too hot.
It just presents me a fancy graph when it is happening.
So I 'built' a crappy solution for that as well.
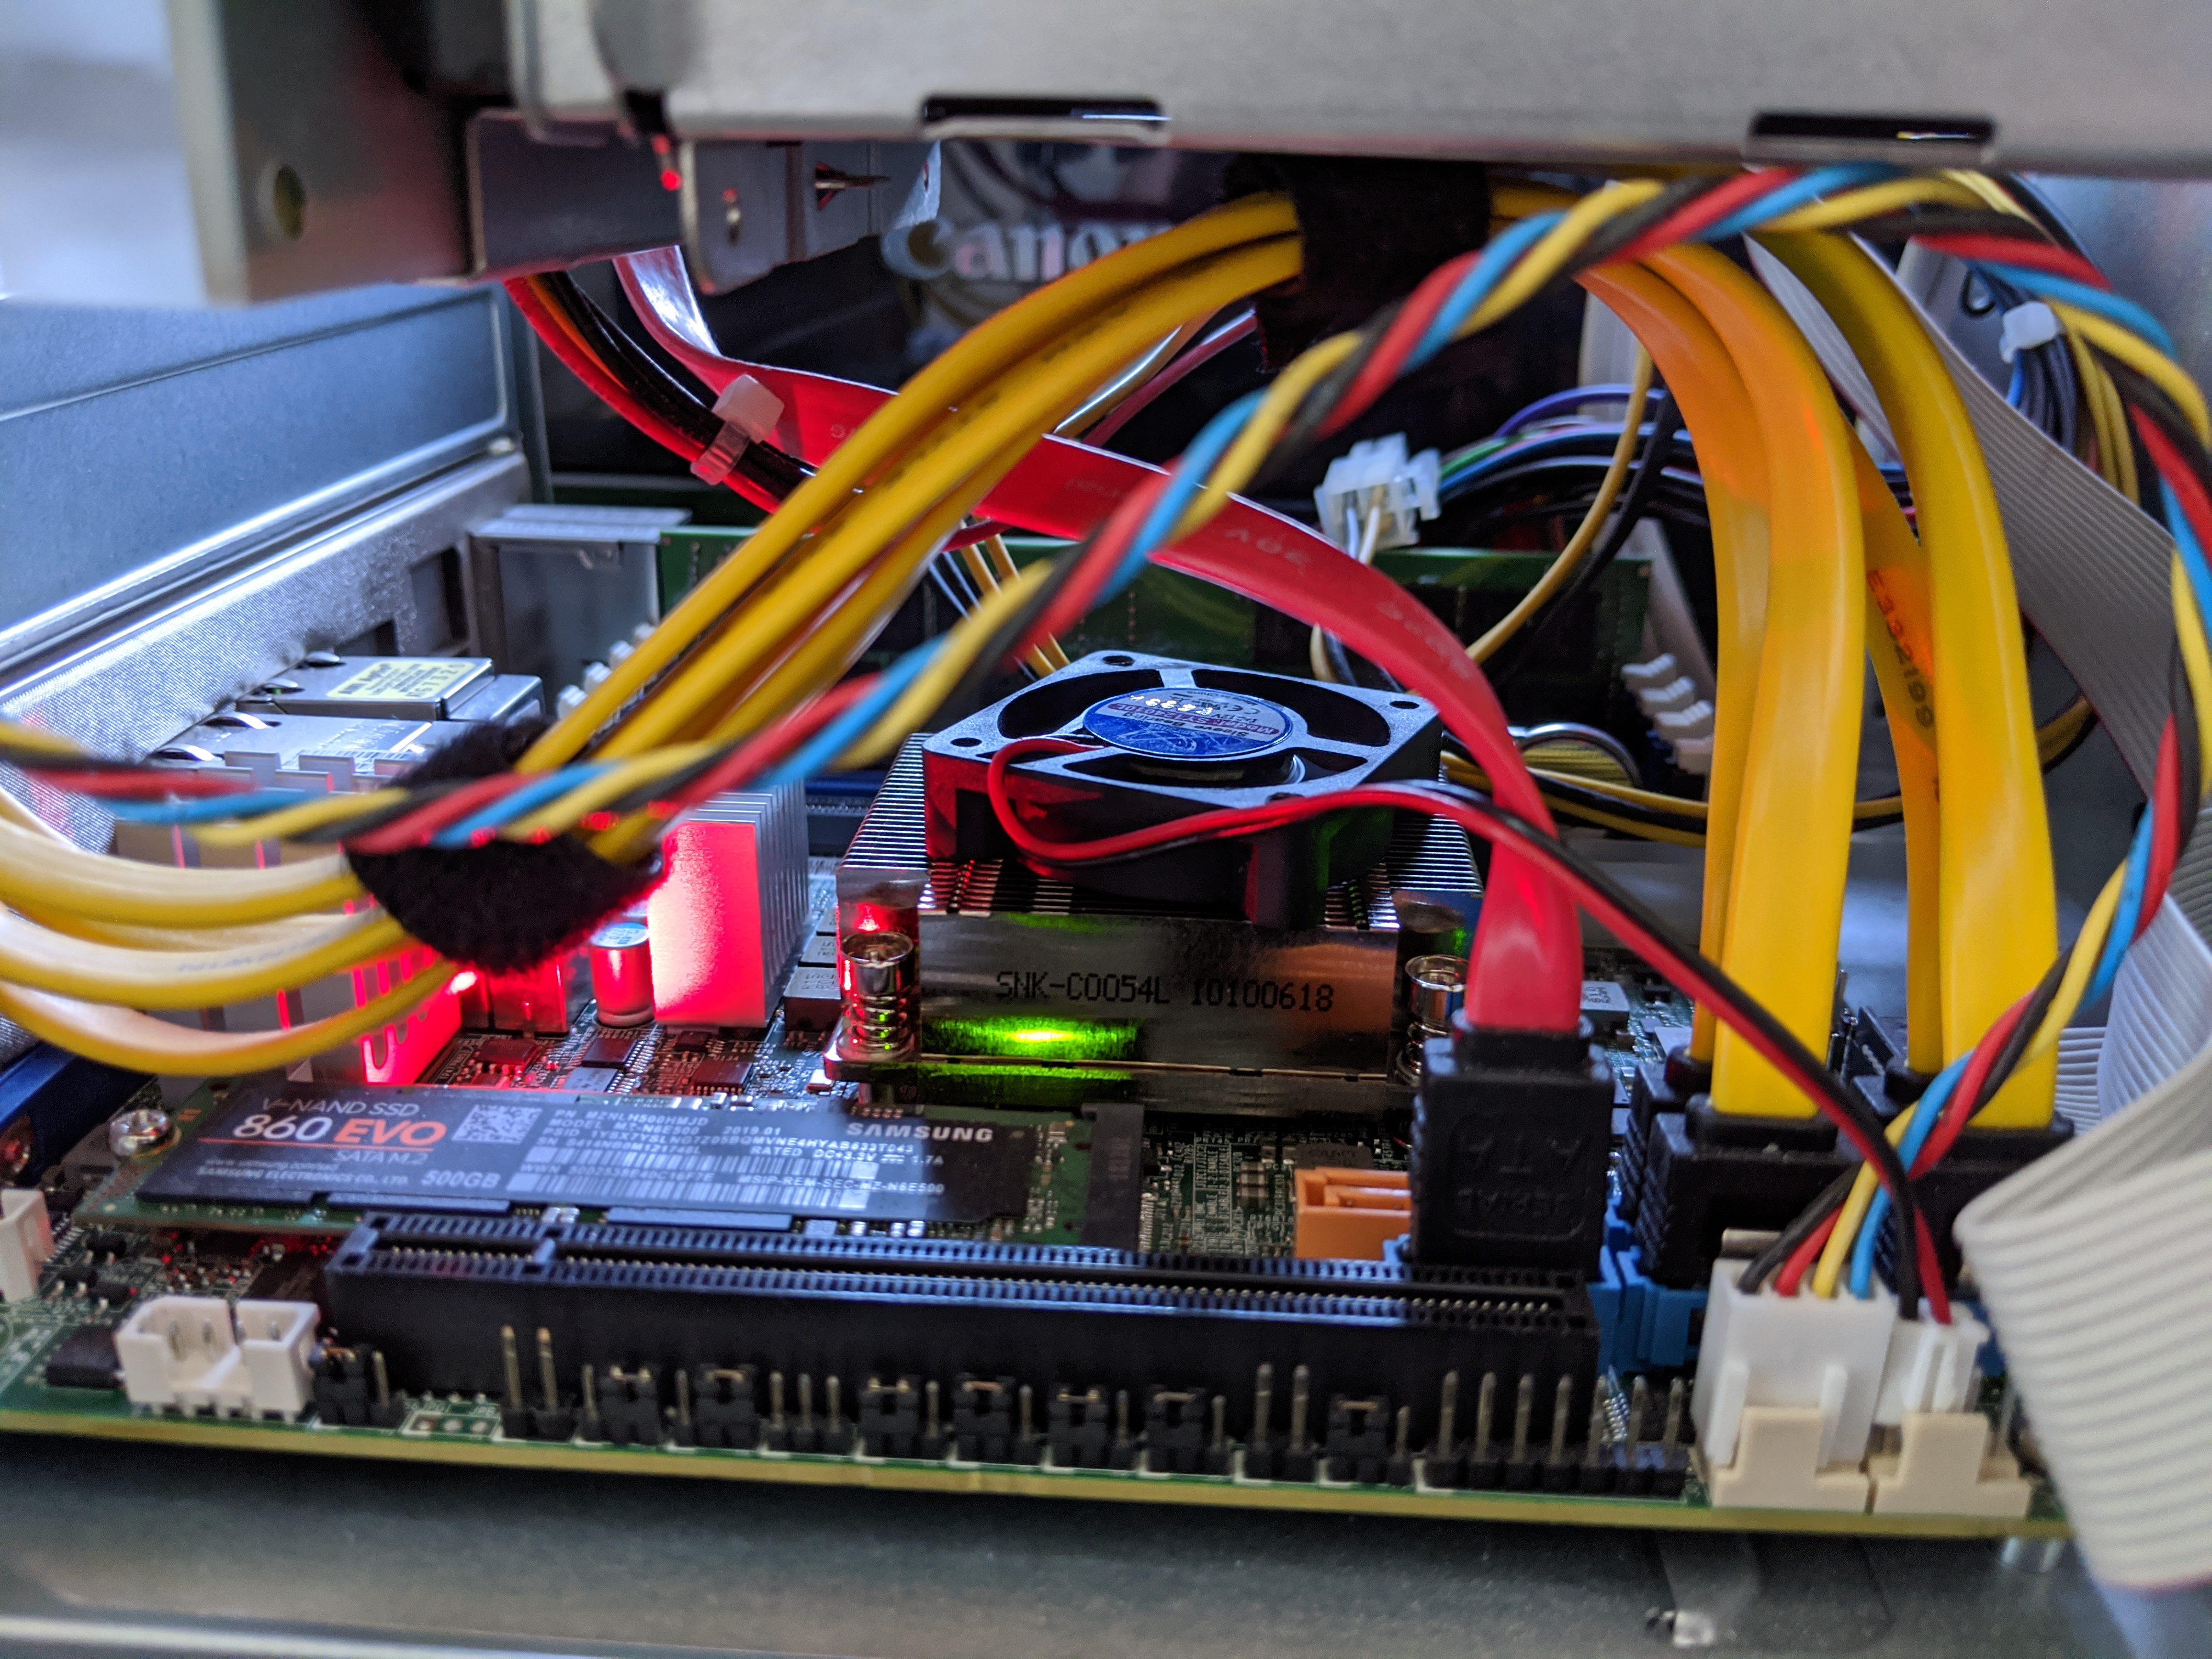
I got a fan out of a old Cisco Catalyst switch and put it on top of the heatsink.
And according to my monitoring it works surprisingly well.
Maybe I get a propper cooling solution for the MBD-X10SDV-6C-TLN4F-O or not time will tell.
15 May 2020
Let's think about a little scenario here:
You already have a infrastructure to build and deploy debian packages.
And Debian packages are your main way of distributing things.
Your internal python project obviously also packaged as a debian package.
But not all of the needed dependencies are available in the official package repositories.
What now? we need to package some python packages ourselves!
Which is surprisingly straight forward.
First you need stdeb and devscripts:
sudo apt-get install python3-stdeb devscripts
Then you need to find the git repo of the missing python dependency.
Most pip packages have the official repository linked somewhere.
After cloning the most of the work is done by stdeb.
We can run setup.py like this:
python3 setup.py --command-packages=stdeb.command debianize
This will create the debian folder and most of the configuration.
A few changes I usually do is chaining the format from quilt to git in debian/source/format.
And the second thing we need to do by hand is update the Build-Depends: in debian/control.
At least add git-core and all the python packages needed to build and test the package.
To get inspiration what this could be check install_requires and tests_require in setup.py.
Install all build dependencies by hand or use mk-build-deps.
And test build it with:
Last but not least I like to add some tmp files to .gitignore.
.pybuild/
debian/debhelper-build-stamp
debian/files
debian/<PKG-NAME>.debhelper.log
debian/<PKG-NAME>.postinst.debhelper
debian/<PKG-NAME>.prerm.debhelper
debian/<PKG-NAME>.substvars
debian/<PKG-NAME>/
Thats it, write your Jenkins/Gitlab/Whatever CI script to build and publish your newly created debian package.
23 Apr 2020
This is how I configured my OpenVPN site-to-site tunnel between a MikroTik hEX S
and my apu4c2 running OPNsense.
The setup looks something like this:
                                +--------------+
                                |              |
                            +-->+ The Internet +<-+
                            |   |              |  |
                            |   +--------------+  |
                            |                     |
                            |                     |
                            |                     |
                            |                     |
+---------------------------+--+             +----+------------------------------+
| Opensense (acting as server) |             | MikroTik hEX S (acting as client) |
|                              |             |                                   |
| IP: 192.168.1.0/24           |             | IP: 192.168.2.0/24                |
| DDNS: opnsense.example.com   |             | DDNS: mikrotik.example.com        |
+------------------------------+             +-----------------------------------+
OPNsense server configuration
Lets start to setup the OPNsense part which will act as a server.
Certificate
First we need to create certificates under System > Trust > Authorities.
There we can create a new CA to self signed certificates for your sever and client.
With the new CA we can create 2 certificates in System > Trust > Certificates.
Hint: Think about the lifetime of these certificates,
the default of 2 years where not enough for me.
And plan to rotate CA, client and server certificate before they expire.
The first certificate we create is the on for the OpenVPN server.
The important options are:
The options for the server cert:
Methode: Create an internal Certificate
Certificate authority: the one you just created
Type: Server Certificate
Common Name: opnsense.example.com
The second certificate we will create is the client certificate.
The important options are:
Methode: Create an internal Certificate
Certificate authority: the one you just created
Type: Client Certificate
Common Name: mikrotik.example.com
-> Use the export as .p12 format we will use this later!
OpenVPN server
The next step is to setup a OpenVPN sever.
Luckily for us OPNsense provides OpenVPN out of the box.
So we just go to VPN > OpenVPN > Servers and configure a OpenVPN server.
The important options are:
Server Mode: Peer to Peer (SSL/TLS)
Protocol: TCP
Peer Certificate Authority: the CA you created
Server Certificate: the server cert
Encryption algorithm: AES-256-CBC (256 bit key, 128 bit block)
Auth Digest Algorithm: SHA1 (160-bit)
IPv4 Tunnel Network: 10.0.8.0/24 (or a other unused IP range)
IPv4 Local Network: 192.168.1.0/24
IPv4 Remote Network: 192.168.2.0/24
Compression: No Preference
The last thing is to ensure that OpenVPN creates a internal route.
Without this OpenVPN would drop the packages coming from our client.
(see OpenVPN FAQ)
To do this we need to create a client specific override in VPN > OpenVPN > Client Specific Overrides.
The important options are:
Common name: mikrotik.example.com (needs to match your client certificate)
IPv4 Local Network: 192.168.1.0/24
IPv4 Remote Network: 192.168.2.0/24
Last but not least you need to think about the firewall settings.
You need a rule that allows traffic on your wan interface on the OpenVPN server port for TCP.
And by default all traffic from OpenVPN would be dropped,
so you need a similar rule like on your LAN interface,
where you allow all traffic or create specific rules for your site to site connection.
MikroTik client configuration
If you haven't already download the client certificate as .p12.
Why? So disappointing. But you can still do that on your OPNsense in System > Trust > Certificates.
OpenVPN client
Now we can import the client certificate.
To do this you need to upload it to Files.
And then it is available in System > Certificates where you can click Import and select it.
After that you should have 2 new certificates in System > Certificates
ending in p12_0 and p12_1. (You can rename them if you want)
With that out of the way we can configure in PPP our OpenVPN client.
Click on Add New > OVPN Client.
The important options are:
Connect To: opnsense.example.com
User: (doesn't matter but can not be empty)
Certificate: (the one with .p12_0)
Auth: sha1
Cipher: aes 256
(Update Updated params)
Logs & Debugging
No matter how hard I try usually something is not working.
This is why this section exist.
This are a few tips how to figure out why and what is not working in this setup.
MikroTik
By default there are not may logs.
To enable debug logs:
/system logging add topics=ovpn,debug
OPNsense
And on server side I like to run the process by hand to see all output directly on stdout.
To do that we need to be root.
To find the correct process we can do this:
# ps aux | grep openvpn
root     61373   0.0  0.3 1061388  6192  -  Ss    7Mar20     0:50.15 /usr/local/sbin/openvpn --config /var/etc/openvpn/client2.conf
root     79177   0.0  0.4 1061388  7152  -  Ss   22:33       0:08.81 /usr/local/sbin/openvpn --config /var/etc/openvpn/server3.conf
As you can see I have 2 OpenVPN processes running but only on of the is
started with a server config to this is the process which I'm interested in.
Now that we know that our config file is /var/etc/openvpn/server3.conf,
we can stop the OpenVPN server in the UI.
Open the config file and remove the line daemon in the config file.
Now we are ready to start the process by hand:
/usr/local/sbin/openvpn --config /var/etc/openvpn/server3.conf
This way you see all logs on the console instant.
Versions
These are the versions I used at the time of writing this post.
OPNsense:
OPNsense 20.1.2-amd64
FreeBSD 11.2-RELEASE-p17-HBSD
LibreSSL 3.0.2
MiroTik hEX S:
RouterOS v6.45.8 (long-term)
Thanks
And a special thanks to @gmanual,
who created a similar setup with pfSense.
And to lewish for creating asciiflow.