27 May 2019
I read How to enable Core Performance Boost on AMD platforms?.
Which lead me to the question did I upgrade my apu board bios.
And the answer is a conclusive maybe.
So here are the steps to upgrade a apu board bios
on OPNsense (or basically every FreeBSD).
To check the current bios version there is a tool called dmidecode.
# dmidecode -t bios
Scanning /dev/mem for entry point.
SMBIOS 2.7 present.

Handle 0x0000, DMI type 0, 26 bytes
BIOS Information
	Vendor: coreboot
	Version: v4.9.0.3
	Release Date: 03/08/2019
	ROM Size: 8192 kB
	Characteristics:
		PCI is supported
		PC Card (PCMCIA) is supported
		BIOS is upgradeable
		Selectable boot is supported
		ACPI is supported
		Targeted content distribution is supported
	BIOS Revision: 4.9
	Firmware Revision: 0.0
The next step is to check https://pcengines.github.io/
for new bios versions.
Now it is very important to download the correct bios version which matches
your hardware version.
And then just one flashrom command is needed (this needs root permissions):
# pkg install flashrom
# fetch https://3mdeb.com/open-source-firmware/pcengines/apu3/apu3_v4.9.0.5.rom
# flashrom -w apu3_v4.9.0.5.rom -p internal
flashrom v1.0 on FreeBSD 11.2-RELEASE-p9-HBSD (amd64)
flashrom is free software, get the source code at https://flashrom.org

Using clock_gettime for delay loops (clk_id: 4, resolution: 2ns).
coreboot table found at 0x7eed0000.
Found chipset "AMD FCH".
Enabling flash write... OK.
Found Winbond flash chip "W25Q64.V" (8192 kB, SPI) mapped at physical address 0x00000000ff800000.
Reading old flash chip contents... done.
Erasing and writing flash chip... Erase/write done.
Verifying flash... VERIFIED.
Now you can reboot and enjoy your new bios!
A common issue is that the the mainboard tag does not match
the tag in the rom file:
This coreboot image (PC Engines:apu3) does not appear to
be correct for the detected mainboard (PC Engines:PCEngines apu3).
Aborting. You can override this with -p internal:boardmismatch=force.
If that happens make sure you downloaded the right rom file and then force it:
# flashrom -w apu3_v4.9.0.3.rom -p internal:boardmismatch=force
flashrom v1.0 on FreeBSD 11.2-RELEASE-p9-HBSD (amd64)
flashrom is free software, get the source code at https://flashrom.org

Using clock_gettime for delay loops (clk_id: 4, resolution: 2ns).
coreboot table found at 0x77fae000.
Found chipset "AMD FCH".
Enabling flash write... OK.
Found Winbond flash chip "W25Q64.V" (8192 kB, SPI) mapped at physical address 0x00000000ff800000.
This coreboot image (PC Engines:apu3) does not appear to
be correct for the detected mainboard (PC Engines:PCEngines apu3).
Proceeding anyway because user forced us to.
Reading old flash chip contents... done.
Erasing and writing flash chip... Erase/write done.
Verifying flash... VERIFIED.
18 May 2019
I finally connected my NAS with my build server with 10 Gigabit Ethernet.
The network card I used is the: Chelsio CC2-N320E-SR.
You get this cards around 30$ from ebay and similar places.
Plus the direct attach cable needed, which costs around 8-20$,
we are looking at a total of less than 100$ to connect 2 computers
with 10GbE. Which is very impressive to me.
The coolest part about this cards is that they just work out
of the box with FreeBSD. This was harder than expected. Since I put
the first card in slot 1 of my Dell T20 and it never showed up.
According to the documentation the 1 slot is: One full-height,
half-length x16 PCIe Gen3 card slot connected to processor.
It is unclear to me why the card never showed up,
not in the BIOS, not with pciconf -lv.
So I moved it to slot 4: One full-height,
half-length x16 (x4) PCIe Gen2 card slot connected to PCH.
And it showed up.
When the card is recognized the drive is loaded automatically.
And you can check dmesg if the card needs a firmware upgrade.
kernel: cxgbc0: using MSI-X interrupts (9 vectors)
kernel: found old FW minor version(5.0), driver compiled for version 7.11
kernel: cxgbc0: firmware needs to be updated to version 7.11.0
The firmware binary: t3fw-7.11.0.bin is found on
https://service.chelsio.com/legacy.html.
This can then be unpacked and flashed with the help of cxgbtool.
(Which is shipped with FreeBSD but needs to be compiled)
cd /usr/src/tools/tools/cxgbtool
make install
cxgbtool cxgb0 loadfw t3fw-7.11.0.bin
And that's it, reboot and check dmesg again.
There is a great blog post by Boris Tassou
which explains many of these steps in detail if you are interested.
Now to the big question how fast is it?
According to my very primitive iperf testing:
[ ID] Interval Transfer Bandwidth [ 3] 0.0-10.0 sec 7.82 GBytes 6.71 Gbits/sec
31 Mar 2019
Today is the world backup day.
This is a wonderful excuse to talk about how I do backups (again).
And I can happily report that the solution I build and blogged about is working perfectly.
(If you missed that here is the blog post from two years ago ZFS remote backups).
The biggest change since then is the hardware. You might remember
that I own a Dell T20 which
is still very cool hardware but with a Intel(R) Xeon(R) CPU E3-1225 v3 it uses quit a bit of power.
That is why I switched to a self built solution with a Intel(R) Xeon(R) CPU D-1528. This is 35 watt TDP instead of 84 watt TDP. But you can
read all about that in my previous blog post Self built NAS
The big improvement I implements since last year is the monitoring.
I switched from observium to telegraf, grafana and influx for monitoring.
The next logical step was to create a dashboard for my backup status.
This is how it looks (you can find the template in this gist):
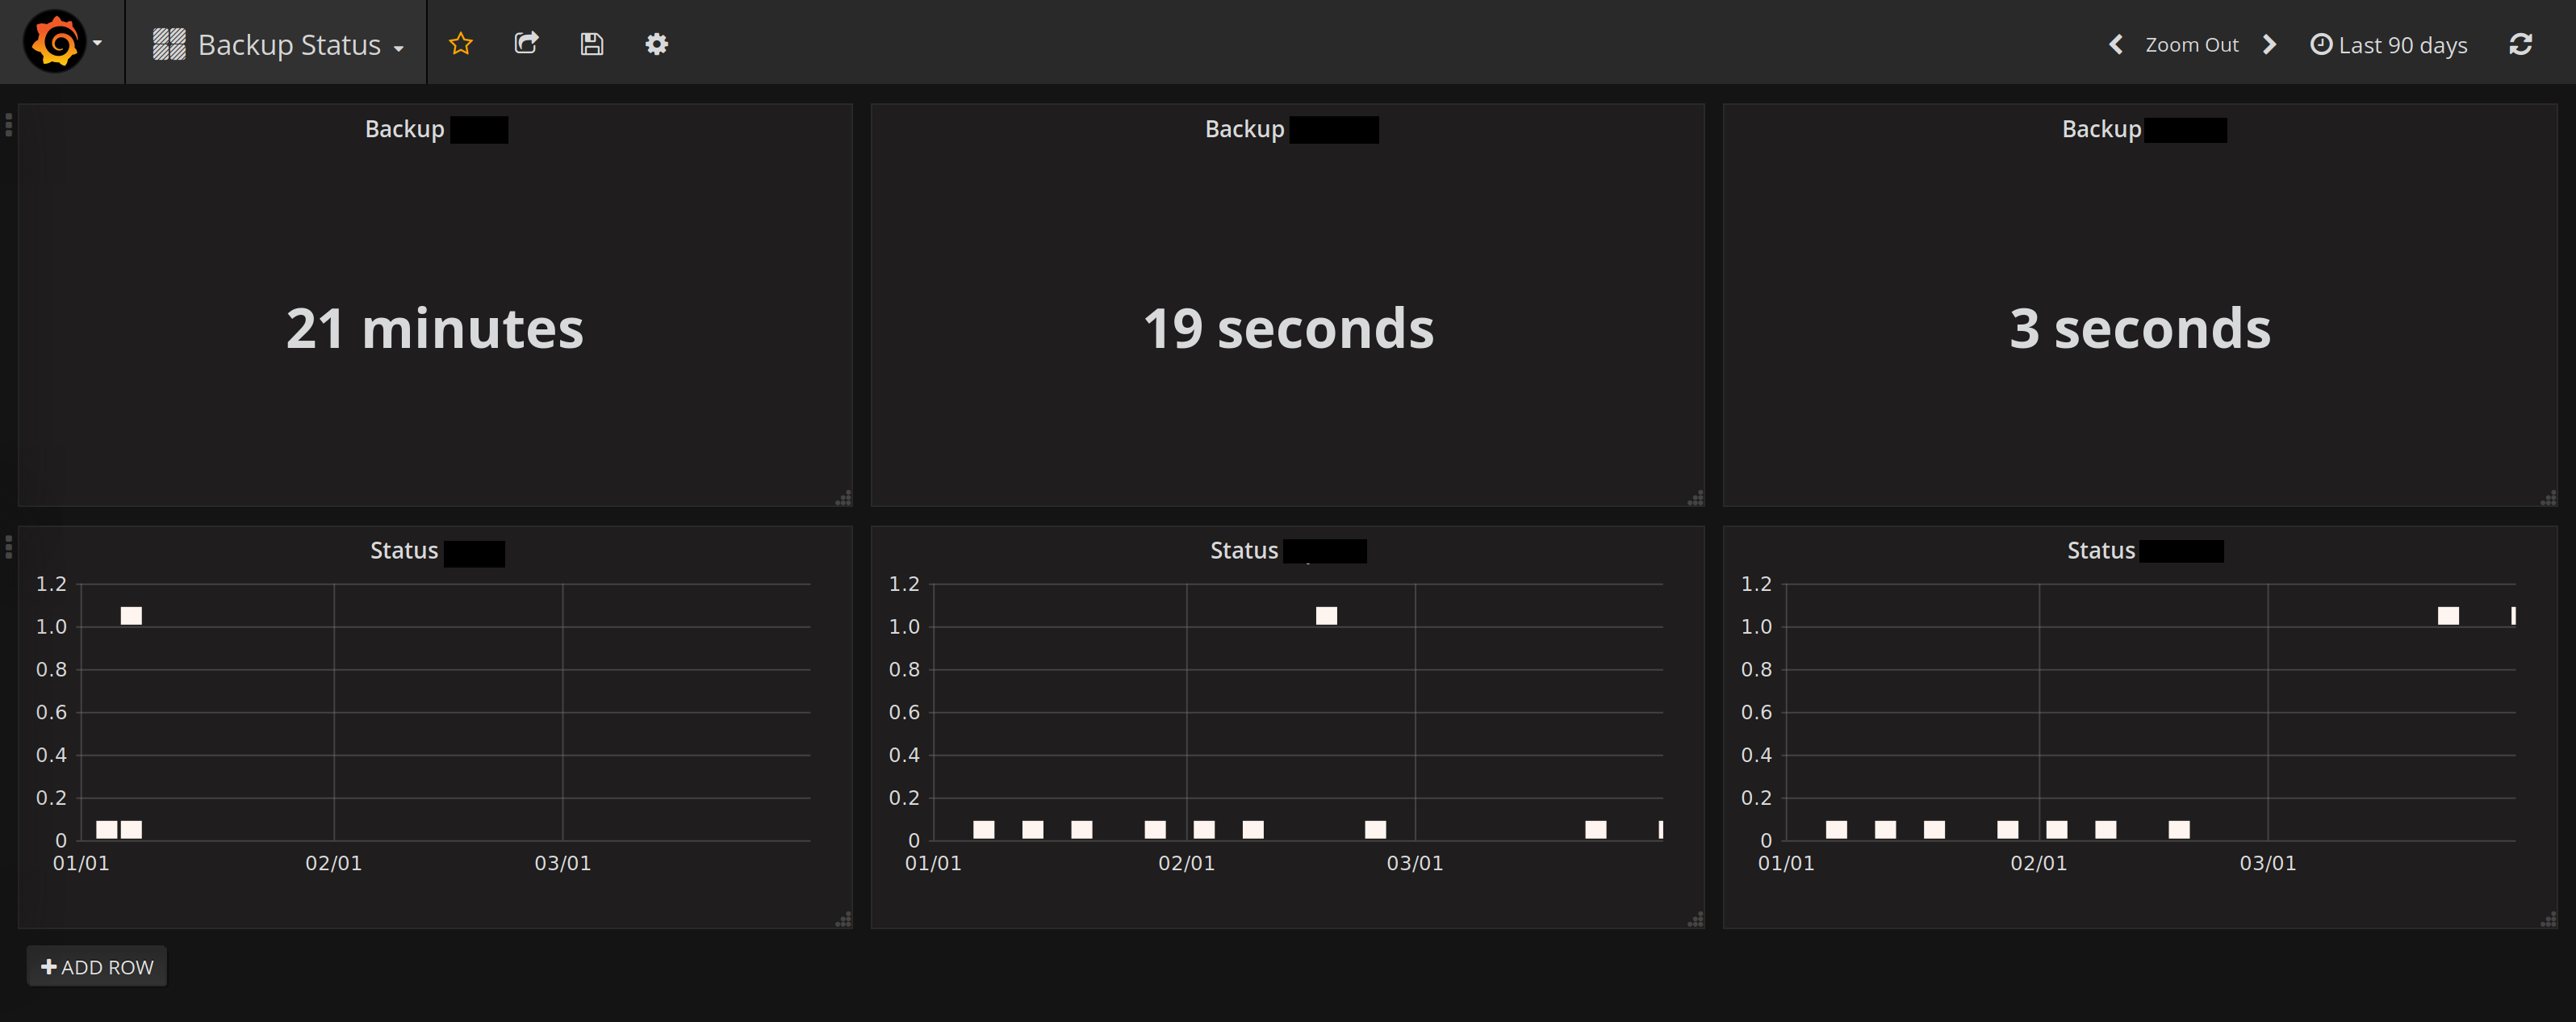
Which is so much better than just write the infos to a log file
in /tmp and check it manually.
It is built with the Line Protocol of influx.
Which allows to post data with curl.
curl -i -XPOST -u username:password 'https://hostname:8086/write?db=databasename' \
        --data-binary "backup,host=backuphost status=${code}i
backuptime,host=backuphost value=${SECONDS}i"
It is not perfect but it is the best solution I ever built.
And here is your reminder: do backups,
check if your backup was executed successful (visibility in a dashboard helps immensely)
and last but not least try to restore it. A backup with out restoring is useless.
23 Mar 2019
Requirements for my new NAS
I thought it's 2019 and time for 10GbE. Also I was bored, so I upgraded my
Dell T20 after 5-ish years.
The main features I was looking for: lower power consumption, 10GbE Network and
M.2 SSD boot support.
M.2 SSD boot support is important to me since I upgraded the Dell T20 with a PCI adapter
to have a M.2 SS as boot device. Which did not work as well as expected and I needed a
USB stick for /boot. This is very annoying.
10GbE Network is self explanatory it is the future and who doesn't want the future now.
Last but not least less power consumption the Dell T20 comes with a Intel(R) Xeon(R) CPU E3-1225 v3
which has a 84 watt TDP which is unfortunate but I needed the power for Plex movie encoding.
But as time has gone on CPUs use less power for the same or more performance.
What I built
As motherboard I selected the MBD-X10SDV-6C-TLN4F-O.
It ticks all the boxes, I wanted to have from new hardware. Also I think it is one of the
better price/value motherboards you can find. It has 2 10GbE NICs. It has the M.2 SSD slot on
the motherboard and I can boot FreeBSD from it. And it uses a Intel(R) Xeon(R) CPU D-1528
which is 35 watt TDP. That is less than halve of the E3-1225 v3 at the same passmark score.
This means it still is fast enough to live transcode my plex moves for me.
This motherboard is now in a Supermicro mini tower SC721TQ-250B.
In general I like the case but in comparison to the Dell T20 it is not as quite as it use to be. Mostly the fault of
the 30mm fan on the PSU I guess. But on the bright site with this case it is possible to hot-swap disks. And I got an
insanely good deal on it.
To power my ZFS pool which is still on 3x8TB HDDs (never did an update on this as far as I remember)
I added Kingston Server-Branded Memory KSM24RD4/32HAI 32GB ECC, Registered. As boot disk I use a
Samsung SSD 860 EVO M.2 500GB which is more than enough space for the base OS and all my jails.
Migration
Thanks to ZFS and iocage the migration was very smooth. I just
setup FreeBSD 12.0 and copied over a few config files like /etc/rc.conf. Exported the ZFS volume
on the Dell T20, put the disk in the new server and just imported it again. I did the same for
all the jails just iocage export and iocage import on the other side. After some minor
jail config tweaks all my services where up and running again. (I forgot to migrate a jail but that is
a story for an other time) The entire migration took about 45 min from start to finish.
27 Jan 2019
2019 is the year of Linux on the desktop 🎉! Or something.
We all know to be a successful platform you need to have
emojis. And who can hate emojis, they are the best.
So here is how you get a simple way to use emojis and other
special characters on Linux (with i3 and rofi). It was
surprisingly easy (probably because I mostly just stole it from
entiPi).
You need two programs to get started rofi to display the menu and xclip
to put characters in your X selection buffer to paste it. My keyboard shortcut
is Win + u for unicode. And it looks like this in my i3 config:
bindsym $mod+u exec --no-startup-id rofi -lines 10 -dmenu -input ~/.symbols.txt | cut -d' ' -f1 -z | xclip -selection c
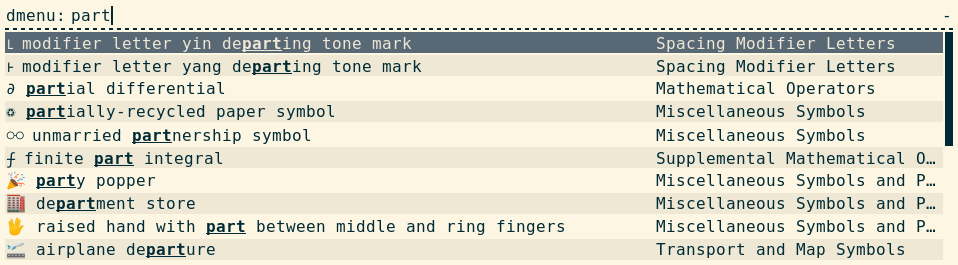
As you can see it takes the character from the .symbols.txt file. The format is simple
it is just 'character' 'name' 'category'. Checkout a example symbols file from
github
☮ peace symbol Miscellaneous Symbols
Now you can search for the character and press enter to add it to the X selection buffer
and paste it where ever you want (Terminal, Pull Request, Email, etc.).
👍 Have fun with unicode 👍