12 Dec 2020
I use pass - the standard unix password manager as my primary password manager.
Which worked great in the past. I have a git repository which I could clone from my phone and my computers
and access all my passwords and secrets.
This git repository is hosted by a local Gitea instance.
Running on port 3000 with the built-in TLS support (a very important detail).
Intro
Until this week.
What happened was that I destroyed my Pixel 3a and replaces it with a Pixel 4a.
Which is in itself sad enough.
But when I tried to setup the password store the first step was to install
OpenKeychain: Easy PGP
and import my PGP key.
This part worked fine so next up was to install the Password Store (legacy) app.
So and as you can see apparently this app is legacy and receives no updates.
Fair enough lets just use the new app with the same name Password Store.
Now the sad part starts the new app does not support custom ports as part of the git clone url.
And I was not able to clone the repository with a key or a any other way.
Neither with the new or the old app.
Which is very unfortunate because to setup many apps you need to login again which is hard without a password manager.
So my first thought was to just use the built in TSL option and run it on the standard port 443.
A good idea in theory in practice this would mean some weird hacks to allow to bind sub 1024 port
for non root user or running Gitea as root.
Both not great options but I tried the first one regardless there is a guide
how to make that happen with mac_portacl. (I quickly gave up on this idea)
So the next best thing to do is to finally the correct way and use a nginx reverse proxy with proper Let's Encrypt certificates.
Last time I tried to to that two years ago I gave up halfway through. Not sure why.
Let's Encrypt setup
So here is how my Let's Encrypt setup works.
I use dehydrated running on my host
with a cron job.
This is the entry in the root crontab:
0 0 */5 * * /usr/local/etc/dehydrated/run.sh >/dev/null 2>&1
And the run.sh script calls dehydrated with my user l33tname
to refresh the certificates and copy them inside the jails.
#!/bin/sh

deploy()
{
  host=$1
  cert_location="/usr/local/etc/dehydrated/certs/$host.domain.example/"
  deploy_location="/zroot/iocage/jails/$host/root/usr/local/etc/ssl/"

  cp -L "${cert_location}privkey.pem" "${deploy_location}privkey.pem"
  cp -L "${cert_location}fullchain.pem" "${deploy_location}chain.pem"
  chmod -R 655 "${deploy_location}"
}

su -m l33tname -c 'bash /usr/local/bin/dehydrated --cron'
deploy "jailname"
iocage exec jailname "service nginx restart"

su -m l33tname -c 'bash /usr/local/bin/dehydrated --cleanup'

echo "ssl renew $(date)" >> /tmp/ssl.log
If you want to adapt this script change the user (l33tname) the name of the jail jailname
and your domain in cert_location (.domain.example).
Make sure all the important directories are owned by your user,
currently that is (., accounts, archive, certs, config, domains.txt, hook.sh)
Now the question becomes how does dehydrated refresh the certificates over DNS.
And I'm happy to report things got better since I last tried it.
I get my domains from iwantmyname and they provide an API to update DNS entries.
Since I tried it last time even the deletion works so no unused txt entries in your DNS setup.
And here is how the hook.sh script looks which enables all this magic:
#!/usr/local/bin/bash

export USER="myemail@example.com
export PASS="mypassword"

deploy_challenge() {
    local DOMAIN="${1}" TOKEN_FILENAME="${2}" TOKEN_VALUE="${3}"

    curl -s -u "$USER:$PASS" "https://iwantmyname.com/basicauth/ddns?hostname=_acme-challenge.${DOMAIN}.&type=txt&value=$TOKEN_VALUE"
  echo "\nSleeping to give DNS a chance to update"
  sleep 10
}

clean_challenge() {
    local DOMAIN="${1}" TOKEN_FILENAME="${2}" TOKEN_VALUE="${3}"
    curl -s -u "$USER:$PASS" "https://iwantmyname.com/basicauth/ddns?hostname=_acme-challenge.${DOMAIN}.&type=txt&value=delete"
    sleep 10
}
Or lets say these are the two functions you need to implement with the curl commands needed for iwantmyname.
What is left now it so change the config to use this script.
Make sure HOOK="${BASEDIR}/hook.sh" is set and CHALLENGETYPE="dns-01"
and any other config values you want like email.
Then you can list all hosts names you want a certificate inside domains.txt.
Last but not least accept the TOS from Let's Encrypt with something like this:
su -m l33tname -c '/usr/local/bin/dehydrated --register --accept-terms'
Thats it! It takes some time to setup but it is worth it to have valid TLS certificates for all your services.
Outro
With all that in-place I setup Gitea without TLS and setup a TLS proxy with nginx.
And this allows me to clone my password repository over https in the new app.
So finally I'm able to access all my passwords again an finishing the login on
all my apps.
07 Jul 2020
There is this new thing called IPv6.
And with new I mean it is around longer than me.
In the past I used the Hurricane Electric Free IPv6 Tunnel Broker
to get IPv6 connectivity to my networks.
Because my previous providers didn't had native IPv6.
But this changed since I use Fiber7 by Init7.
They support native IPv6 connectivity and if you ask you even get a static IPv6 range.
For free, and thats a great price!
It took forever to configure it on my Router hEX S.
Because I'm very lazy and not because it is very complicated.
A few facts first, my main interface I use is pppoe-out1.
And for this post lets assume the range assigned by Init7 was 2001:XXXX:YYY::/48.
With all the here is how my configuration looks:
/ipv6 dhcp-client add request=prefix pool-name=fiber7 pool-prefix-length=64 interface=pppoe-out1 add-default-route=yes
/ipv6 address add address=2001:XXXX:YYY::1/64 advertise=yes from-pool=fiber7 interface=bridge1
And the firewall configuration I use to protect my router and the hosts in my network:
/ipv6 firewall filter
add action=accept chain=input comment="allow established and related" connection-state=established,related
add chain=input action=accept protocol=icmpv6 comment="accept ICMPv6"
add chain=input action=accept protocol=udp port=33434-33534 comment="defconf: accept UDP traceroute"
add chain=input action=accept protocol=udp dst-port=546 src-address=fe80::/16 comment="accept DHCPv6-Client prefix delegation."
add action=drop chain=input in-interface=pppoe-out1 log=yes log-prefix=dropLL_from_public src-address=fe80::/16
add action=accept chain=input comment="allow allowed addresses" src-address-list=allowed
add action=drop chain=input

/ipv6 firewall address-list
add address=fe80::/16 list=allowed
add address=2001:XXXX:YYY::/48  list=allowed
add address=ff02::/16 comment=multicast list=allowed

/ipv6 firewall filter
add action=accept chain=forward comment=established,related connection-state=established,related
add action=drop chain=forward comment=invalid connection-state=invalid log=yes log-prefix=ipv6,invalid
add action=accept chain=forward comment=icmpv6 protocol=icmpv6
add action=drop chain=forward in-interface=pppoe-out1
This configuration allows to ping my hosts but nothing else.
To allow access via ssh to some specific hosts I would need to add extra rules.
And last but not least here is how you can test ping google from your router:
ping interface=pppoe-out1 address=2001:4860:4860::8844
This is mostly based on Manual:Securing Your Router. And some other sources I consulted in the process:
07 Jun 2020
You might read my blog post about my CPU running to hot
or not then you can do that here.
This incident lead me to investigate the capabilities of my IPMI a bit more.
The Intelligent Platform Management Interface or for short IPMI
is the interface to your BMC.
BMC is the baseboard management controller which is a scary computer in your computer
running a network stack and interface directly with your hardware.
In general I think it is a good idea to keep that stuff in a very protected network segment.
My main interest was to play around with the cooling fan RPM.
Where I didn't really succeeded.
But regardless of that here are two of the things I learn in the process.
I used a MBD-X10SDV-6C-TLN4F-O Mainboard and installed the ipmitool package on FreeBSD.
Reset user password
The first thing is I set a password and apparently I typed it wrong twice.
Not sure how that can happen but it did.
And here is how to undo that:
sudo ipmitool user list
sudo ipmitool user set password 3 PASSWORD
List the users and set an new password. (In this case the new password would be PASSWORD)
In my case the user had the id 3.
Reboot BMC
And the second thing I learned how to reboot the BMC
independent from the computer itself.
The issue I had was that a fan failure (me short circuiting the pwm pin of a fan)
put all other fans to 100%.
Turns out, this is annoyingly loud.
As we learned in the intro the BMC is just a computer,
meaning we can reboot just like a computer (interdependently for the server).
sudo ipmitool mc reset warm
The important bit here is warm.
If you use cold it would restart your server as well.
Resources
Here are a few resource in no particular order I consulted.
24 May 2020
I had the issue that my Plex Transcoding started failing after I watched some Movies.
After some debugging and guessing I think the issue is the CPU Temperature.
So here is quick way to check on the CLI how the CPU is doing every 2 seconds:
(At least on FreeBSD)
while true; do sysctl dev.cpu | grep temperature; sleep 2; ; done
This is handy to debug and look at the CPU Temperature.
But that is not a way to constantly monitor forever.
So I packed this logic into my telegraf.conf like this:
[[inputs.exec]]
  commands = ["sh -c 'sysctl -n dev.cpu.0.temperature | tr -d C'"]
  name_override = "cpu_temp"
  timeout = "5s"
  data_format = "value"
  data_type = "float"
  [inputs.exec.tags]
    core = "core0"

[[inputs.exec]]
  commands = ["sh -c 'sysctl -n dev.cpu.1.temperature | tr -d C'"]
  name_override = "cpu_temp"
  timeout = "5s"
  data_format = "value"
  data_type = "float"
  [inputs.exec.tags]
    core = "core1"

....
As you can see there is a inputs.exec for each CPU core.
Which can result in a grafana dashboard.
Here is the one I built:
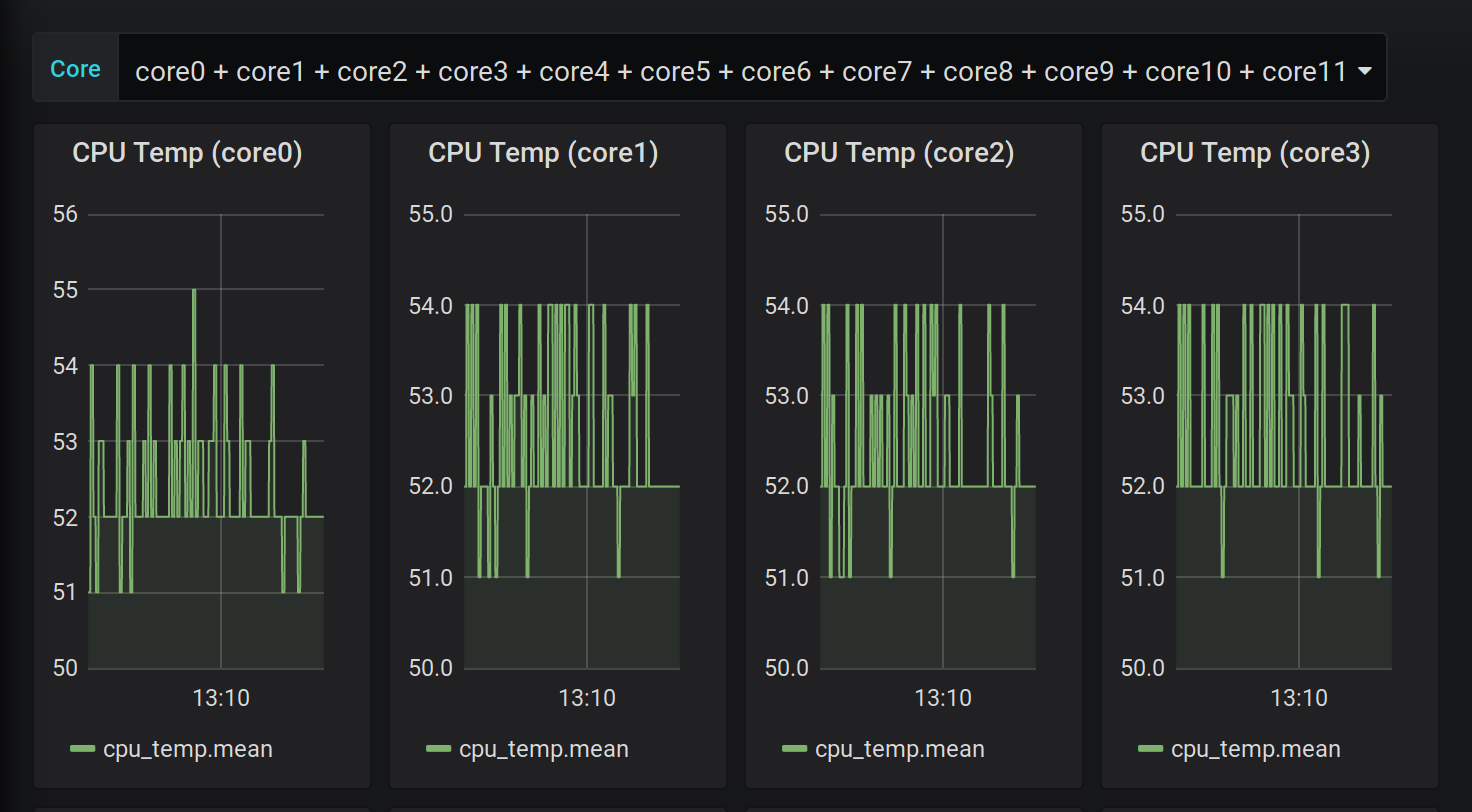
The code for that is for your convenience in this gist.
Probably a few things need to be adjusted.
For example host.domain.tld needs to match your hostname sent by your telegraf configuration.
But this will not solve the issue of the CPU running to too hot.
It just presents me a fancy graph when it is happening.
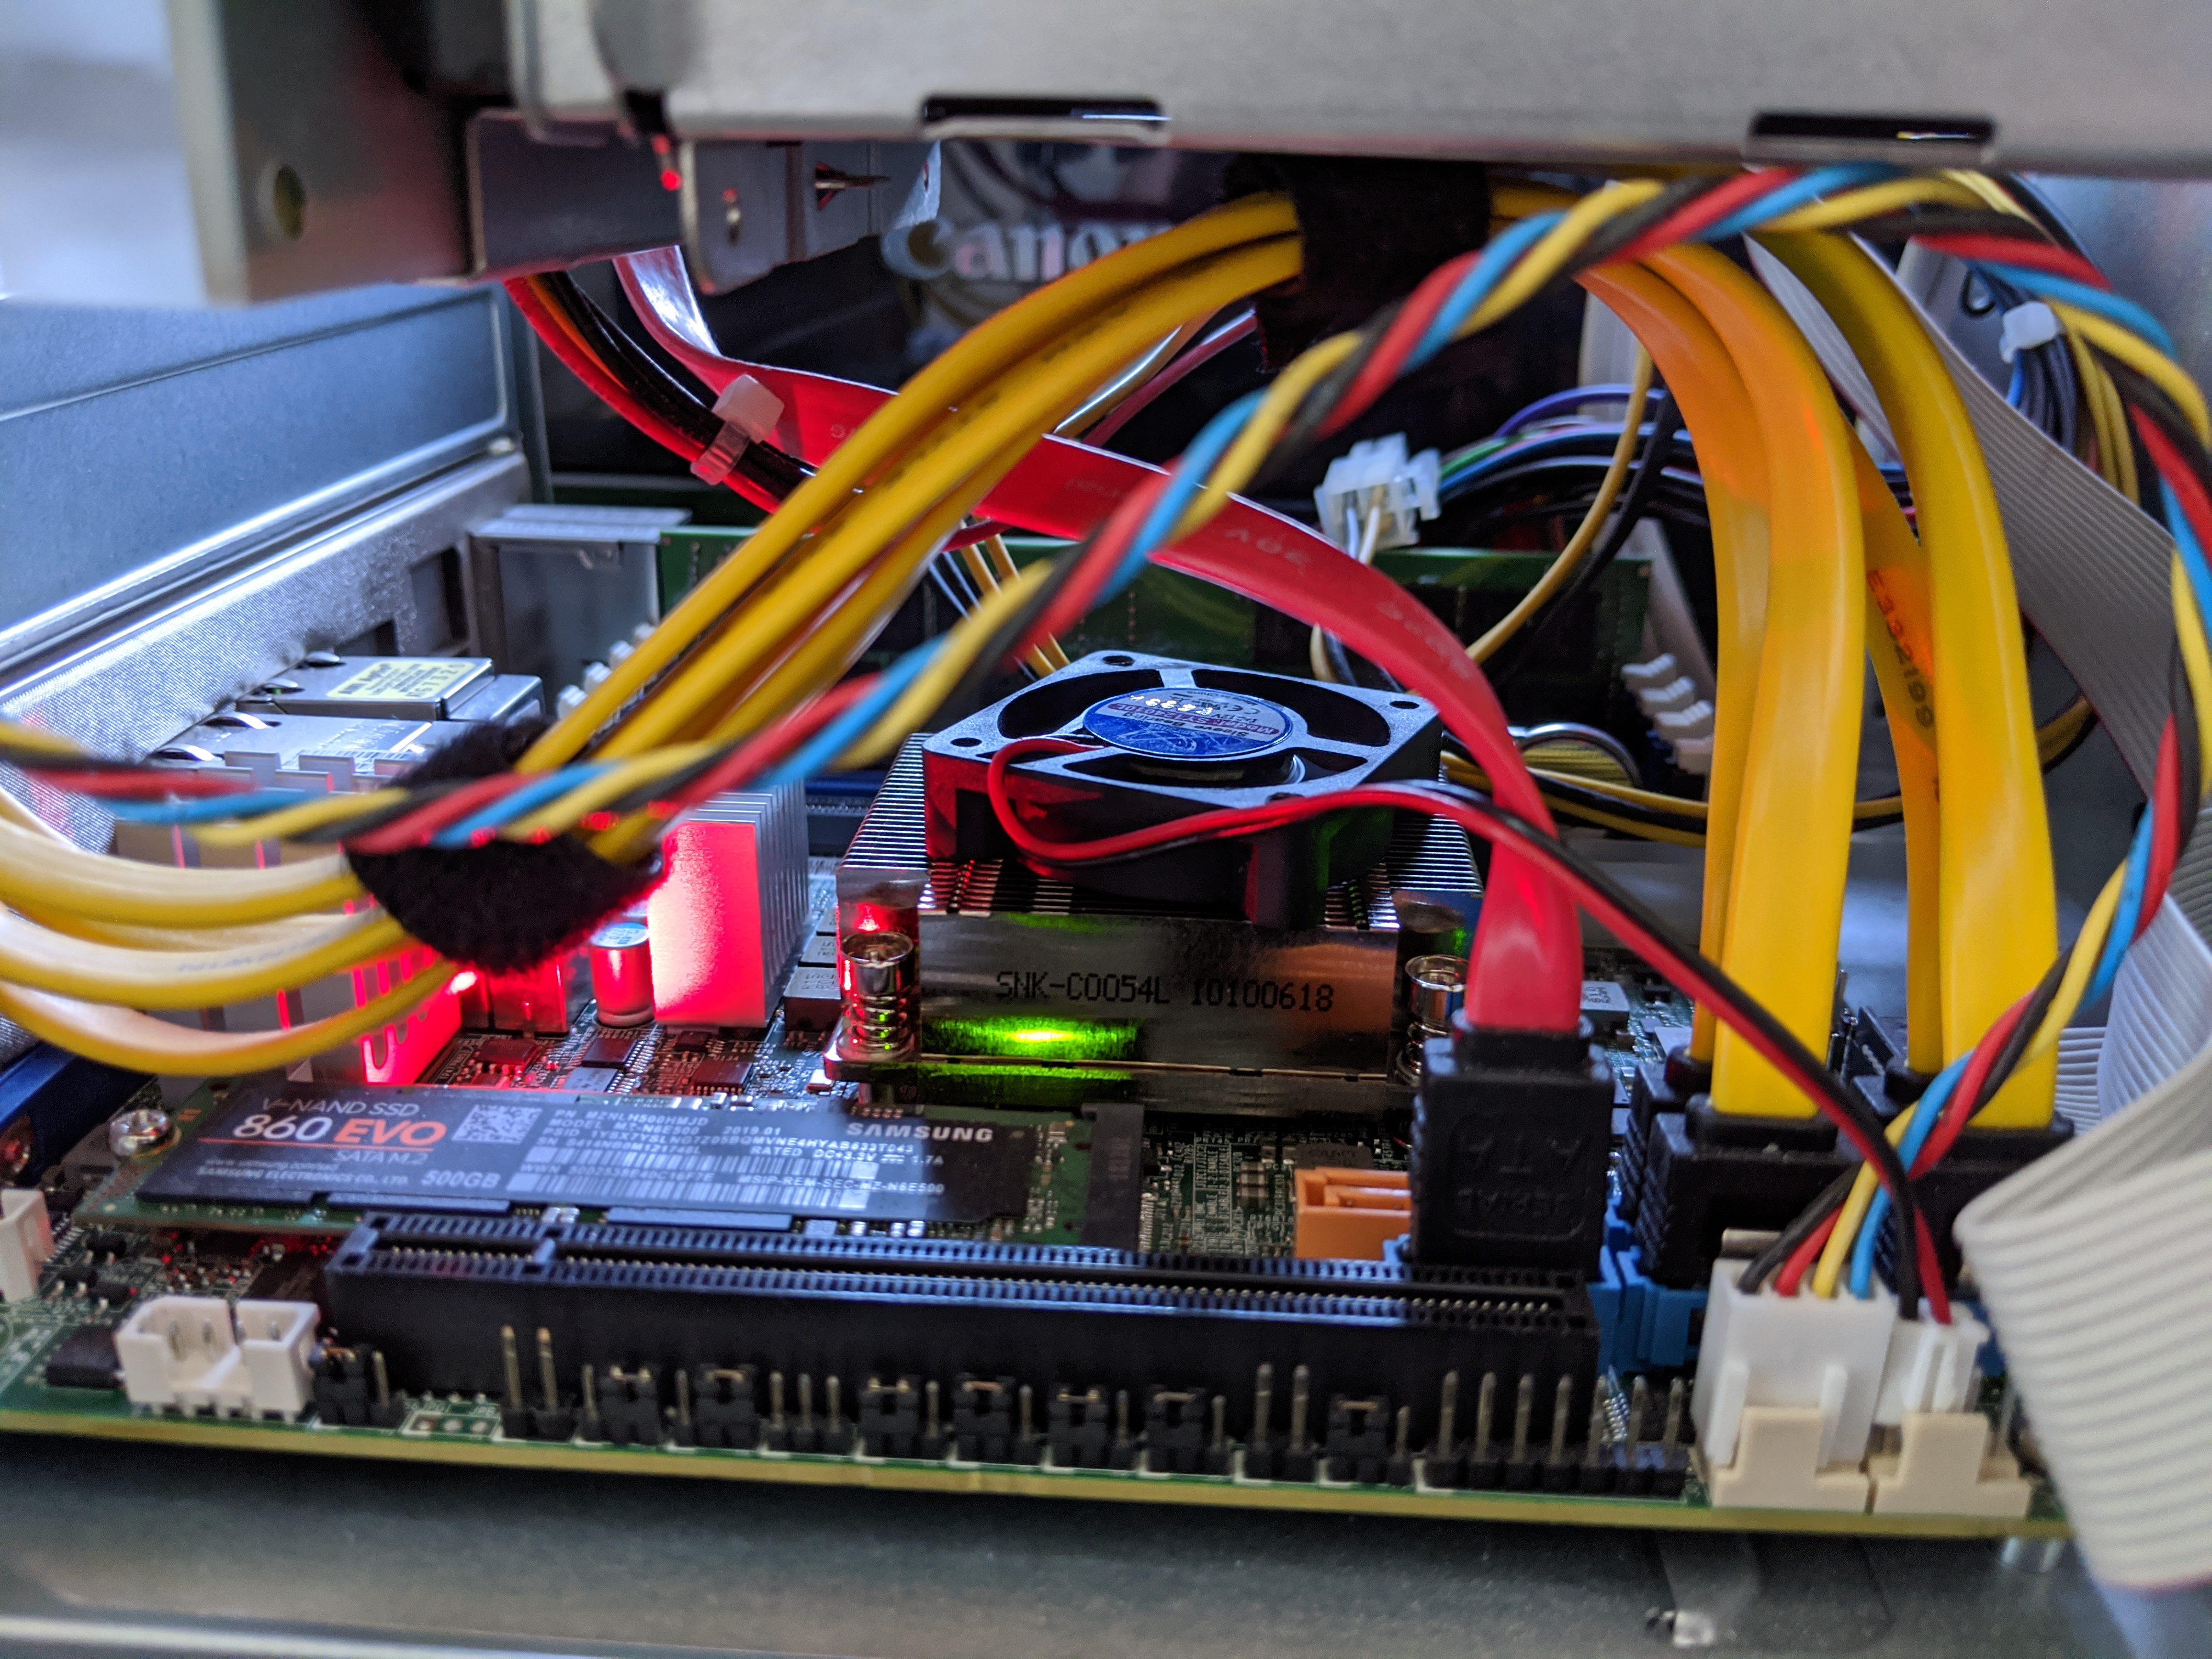
So I 'built' a crappy solution for that as well.
I got a fan out of a old Cisco Catalyst switch and put it on top of the heatsink.
And according to my monitoring it works surprisingly well.
Maybe I get a propper cooling solution for the MBD-X10SDV-6C-TLN4F-O or not time will tell.
15 May 2020
Let's think about a little scenario here:
You already have a infrastructure to build and deploy debian packages.
And Debian packages are your main way of distributing things.
Your internal python project obviously also packaged as a debian package.
But not all of the needed dependencies are available in the official package repositories.
What now? we need to package some python packages ourselves!
Which is surprisingly straight forward.
First you need stdeb and devscripts:
sudo apt-get install python3-stdeb devscripts
Then you need to find the git repo of the missing python dependency.
Most pip packages have the official repository linked somewhere.
After cloning the most of the work is done by stdeb.
We can run setup.py like this:
python3 setup.py --command-packages=stdeb.command debianize
This will create the debian folder and most of the configuration.
A few changes I usually do is chaining the format from quilt to git in debian/source/format.
And the second thing we need to do by hand is update the Build-Depends: in debian/control.
At least add git-core and all the python packages needed to build and test the package.
To get inspiration what this could be check install_requires and tests_require in setup.py.
Install all build dependencies by hand or use mk-build-deps.
And test build it with:
Last but not least I like to add some tmp files to .gitignore.
.pybuild/
debian/debhelper-build-stamp
debian/files
debian/<PKG-NAME>.debhelper.log
debian/<PKG-NAME>.postinst.debhelper
debian/<PKG-NAME>.prerm.debhelper
debian/<PKG-NAME>.substvars
debian/<PKG-NAME>/
Thats it, write your Jenkins/Gitlab/Whatever CI script to build and publish your newly created debian package.