24 May 2025
You might have heard me talk about the new 10Gbit/s setup I'm running.
Plus there is a chance this is the first blog post in the series of:
Nobody intends to build a data center in the basement. 1
How is that possible? Thanks to Fiber7 a product from Init7
people (me) have easy access to 1/10/25 Gibt/s.
Before you asks this is symmetrical meaning up and download.
(I decided against 25G because there is no way to saturate
this much bandwidth right now)
Since this is the first blog post in the series lets start with
where the Fiber meets the first device in my network.
Which is the router as you might have suspected.
I went with the CCR2004-1G-12S+2XS which has an awful name
but great hardware for a decent price.
I also looked at the Zyxel AX7501-B1 which had mixed to bad reviews online
and I'm not familiar with the configuration interface.
The other thing I looked into where the different Ubiquiti UniFi Dream Machines
which are probably also nice options.
Due to personal preference I'm not a huge Ubiquiti fan anymore.
And last but no least self build / custom hardware with something like
OPNsense was also an option I considered.
Because OPNsense is amazing and here is the specific hardware I looked at:
In the end I ran out of time and the fact that I can copy & past a lot of
my existing configuration lead to the decision to go with CCR2004-1G-12S+2XS,
and it did not hurt that it is also recommended by Init7 and comes with example config.
My feelings about the UI and UX of RouterOS did not change but it got recently
a new skin so yay progress I guess?
You can read all about that and the IPv6 & OpenVPN setup in previous blog posts:
The Config
Lets go to the config which I could as expected take over a lot from
my previous setup. This makes this setup a mix of my old setup,
the official Init7 example and Michael Stapelbergs config.
(I like to note that I did not run into the Fan issues and DNS slow-downs which Michael had, I assume things improved in the last 4 years)
The core idea is to create 2 bridges one for wan and one for lan like this:
/interface/bridge/add name=lan
/interface/bridge/add name=wan protocol-mode=none

/interface ethernet set [ find default-name=sfp28-1 ] fec-mode=fec91

/interface bridge port add bridge=wan interface=sfp28-1

/interface bridge port
add bridge=lan interface=sfp-sfpplus1
add bridge=lan interface=sfp-sfpplus2
add bridge=lan interface=sfp-sfpplus3
add bridge=lan interface=sfp-sfpplus4
add bridge=lan interface=sfp-sfpplus5
add bridge=lan interface=sfp-sfpplus6
add bridge=lan interface=sfp-sfpplus7
add bridge=lan interface=sfp-sfpplus8
add bridge=lan interface=sfp-sfpplus9
add bridge=lan interface=sfp-sfpplus10
add bridge=lan interface=sfp-sfpplus11
add bridge=lan interface=sfp-sfpplus12
add bridge=lan interface=ether1
Getting network connectivity from the uplink is also simple:
/ip dhcp-client add disabled=no interface=wan
/ip address add address=192.168.XXX.1/24 interface=lan network=192.168.XXX.0

/ipv6 settings set accept-router-advertisements=yes
/ipv6 address add address=XXXX:XXXX:XXXX::1/64 interface=lan
/ipv6 dhcp-client
add add-default-route=yes interface=wan pool-name=v6pool pool-prefix-length=56 request=address,prefix
Setting up DHCP and neighbor discovery for IPv6:
/ip pool add name=dhcp_pool0 ranges=192.168.XXX.XXX-192.168.XXX.XX
/ip dhcp-server add address-pool=dhcp_pool0 disabled=no interface=lan name=dhcp1
/ipv6 dhcp-server add address-pool=v6pool interface=lan name=v6server
/ip dhcp-server network add address=192.168.XXX.0/24 gateway=192.168.XXX.1 domain=XXXX.network dns-server=192.168.XXX.5,192.168.XXX.6
/ipv6 nd
set [ find default=yes ] interface=lan managed-address-configuration=yes mtu=1500 other-configuration=yes dns=XXXX:XXXX:XXXX::5,XXXX:XXXX:XXXX::6
On the firewall side one of the more important things to setup is FastTrack
to utilize the hardware otherwise it's possible that not the full performance can
be utilized. (Needs to be done for v4 & v6)
/ip firewall filter
add action=fasttrack-connection chain=forward comment=FastTrack

/ipv6 firewall filter
add action=accept chain=forward connection-state=established,related in-interface=wan out-interface=lan
And the other thing to setup on firewall side is the NAT for v4.
/ip firewall nat
add action=masquerade chain=srcnat out-interface=wan
Last but not least I want to show how to setup port forwards / open the firewall for
applications that should be available outside lets use the port 32400 (Plex) as an example.
/ip firewall nat
add chain=dstnat dst-port=32400 action=dst-nat protocol=tcp to-address=192.168.XXX.21 to-port=32400 in-interface=wan comment="Plex"

/ipv6 firewall filter
add chain=forward action=accept protocol=tcp dst-address=XXX:XX:XXX::21 dst-port=32400 comment="plex"
And the OpenVPN setup is 1:1 the same as before see the previous blog posts linked
further up this post. I was able to export the certificates and just import them
on the new device. Important note here is to export with password otherwise the
required private key is not part of the export which took me some time to figure out.
/interface ovpn-client
add add-default-route=no auth=null certificate=site-to-site-mikrotik-client \
    cipher=aes256-gcm connect-to=XXX.network disabled=no \
    mac-address=02:40:XX:XX:XX:XX max-mtu=1500 mode=ip name=ovpn-edlibach \
    port=1194 profile=default protocol=tcp route-nopull=no tls-version=any \
    use-peer-dns=yes user=XXX verify-server-certificate=no
Testing
Now that we have our great setup we obvious want to test that and confirm that everything works.
To test IPv6 i like ipv6-test.com and test-ipv6.com click on the site and get feedback.
The other thing is we want to test if we really are able to saturate the full 10G.
A word of advice if you test with something like speedtest.net depending
on your peer you are not able to test the full 10G.
So preferable use something like iperf3 with the official servers,
but there as well be careful as a single client stream can be not enough
to fully get the 10G speed so try with iperf3 --parallel n or -P n for short.
And last but not least no shout-out to netAlly for the LinkRunner® 10G.
Despite marketing which looks like this: Advanced Multi-Gig/10G Cable & Network Tester.
This thing is not really able to test a 10G link to a random endpoint.
Which is weak for a 6000 euro device.
08 Feb 2025
I just updated the blog post Streaming Setup
to install the latest version of Darkice on Fedora 41.
Or you can use the ansible playbook I create for it: functions/darkice.yml
15 Aug 2024
It is almost 5 years after building my Xeon D NAS,
and my Dell T20 started to fail.
(Well actually as it turned out just the RAM was failing, the rest is still fine)
And here is what I ended up with this round:
- AsRock X570D4i-2t
- AMD Ryzen 5 4500 AM4, 3.60 GHz, 6 Core
- Corsair Vengeance 2 x 32GB, 3200 MHz, DDR4-RAM, SO-DIMM
- Case: Supermicro SC721 TQ-350B2
I was looking for something new with AMD since the Intel boards I seen where less exciting the last few years.
The AsRock X570D4i-2t comes with 10GbE, is mini-ITX sized and takes AM4 socket CPUs.
It can even handle up to 128GB memory which is great since 24GB was not enough to build my FreeBSD packages.
I took the same Supermicro case since I was very happy with it the first time around as it provides space for 4 hot swappable HDDs.
And the form factor is great and it contains already a power supply.
I debated to build a only nvme based NAS but I guess that's and idea for later.
Let's talk about the things I learned/hated.
Starting with minor things: OCuLink is an interesting connector and since I was not sure
if an OCuLink to SATA adapter is part of the mainboard I went ahead and ordered one.
During that I found out that it is not that popular and kinda hard to buy.
I think OCuLink is cool from a technical aspect and is easy to use,
but annoying to buy since it is not wide spread yet.
You might have spotted the 8pin(DC-IN)+4pin(ATX) in the specs for the power connector.
This was supper unclear to me and even with the documentation provided in paper form it was not mentioned.
I needed to consult the full documentation
where on page 25 we can find a drawing for it.
Apparently for 12V you could connect one 8 pin connector, but for a normal ATX you need to connect one 4 pin into
the 8 pin connector and an other 4 pin for CPU.
In the end I'm just happy I didn't fry my mainboard by trying to connect power to this board.
Things getting worse: I own now 3 CPU coolers for this CPU.
The first one is the stock fan which came with the CPU and I had intended to use it.
When starting assembling it became clear that this will not fit and I need a LGA115x fan.
Fair enough I missed that the first time I looked at the specs.
I got one from aliexpress because it is supper hard to find coolers for LGA115x.
A week later when I tried to install this fan I learned that only some LGA115x will
work or I would need to remove the already installed backpannel for the cooler.
This at least to me is the worst design decision by ASRock not to go for a standard cooler mount.
I ended up with Cooler Master I30 I50 I50c MINI CPU Cooler 2600 RPM Quiet Fan For Intel LGA115X 1200 And M-ATX Radiator.
Good news is a lot of people talk about overheating issues as far as my few day testing showed,
this case and the fan do a good job to keep things cool.
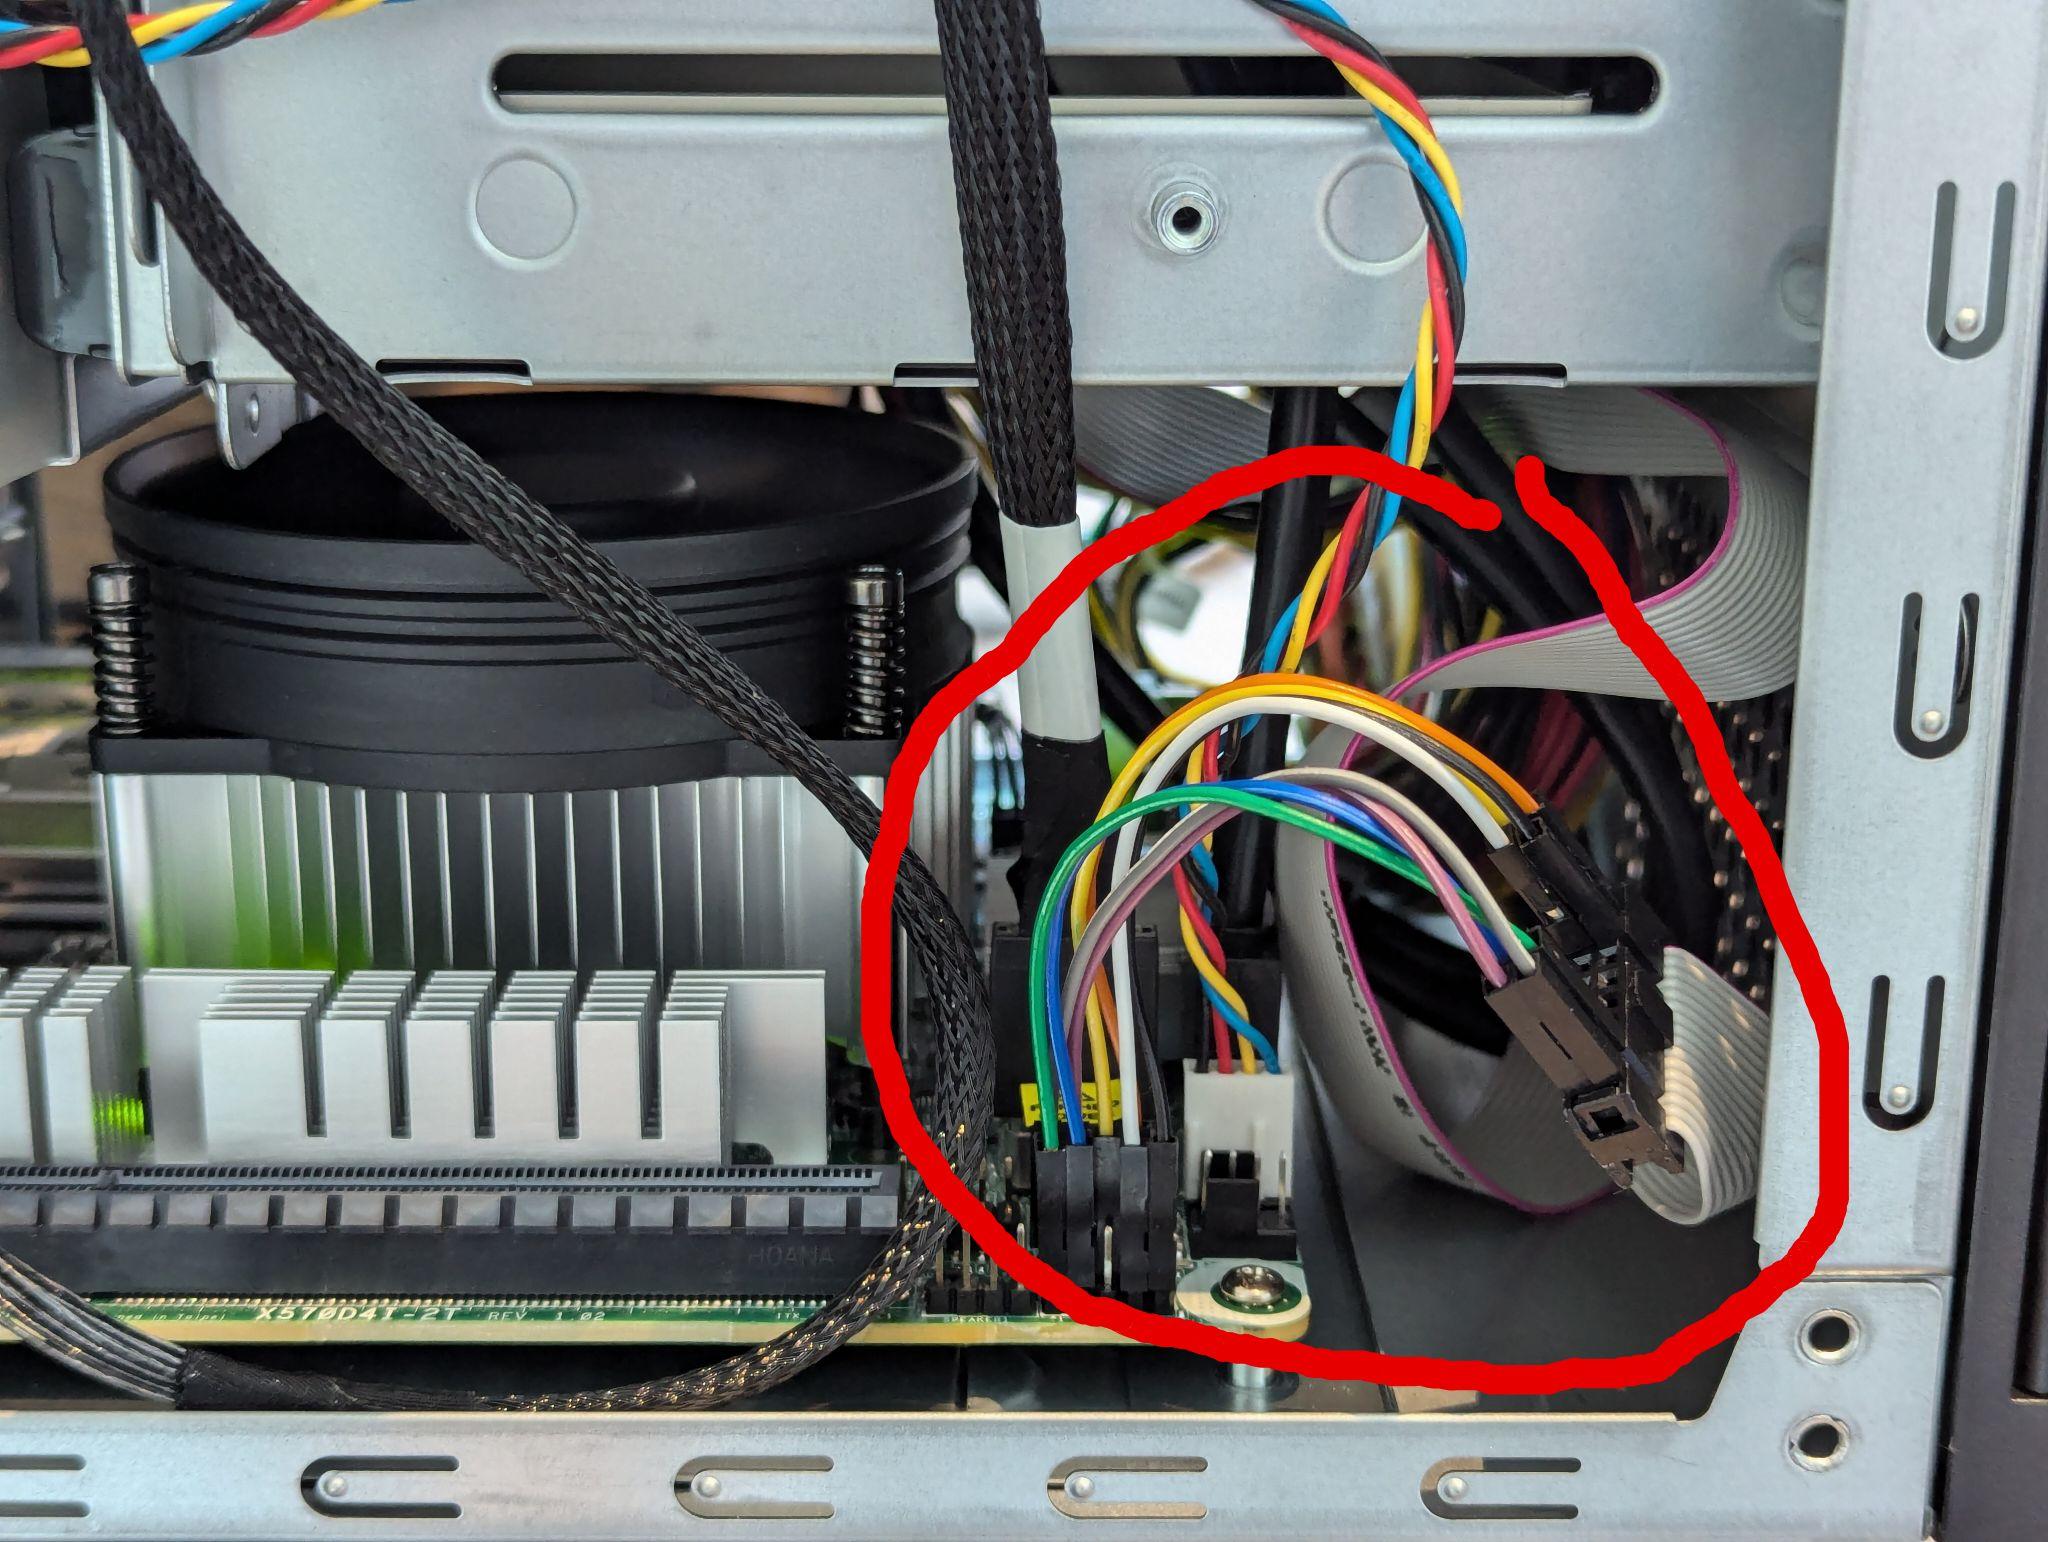
Last but not least I'm not sure who's fault this is but the case front panel connector does not match the mainboard's
System and Auxiliary Panel and I needed to resort to connect these two components manually.
Meaning I needed to first find the documentation for the case which was harder than expected.
It is not in the manual for my case.
I needed to resort to looking up a mainboard which uses this connector and search for it there.
Luckily the X10SDV Mini-ITX Series
documentation contains a the pin layout.
Apparently this thing is called JF1 and the manual contained infos on how to connect.
Here is how it looks:
In summary it runs now for a few days and I'm slowly making sure it runs
all the things I need mainly backup and
building FreeBSD packages.
And I can report that everything runs smoothly and the extra CPU and Memory help to build my packages faster.
In addition a lot of people online had problems with heat, which is something I did not observe yet, everything runs cool.
02 Jun 2024
No worries my complaining about NixOS isn't done :).
But for this blog post we take a break and talk complain about GPG.
I use and love pass as my primary password manager.
Which uses gpg to encrypt and decrypt files which are tracked via git.
(I even have a small rofi script to access passwords quickly)
At some point my previous gpg key expired and since it was 10 years old it was time to update.
A task that sounds easy enough:
gpg --full-generate-key
pass init $keyid
and that should be it. And it might be good enough depending on your gpg version and settings.
Now the only step is to export this key and put it on my phone to unlock my password manager there.
I use a combination of OpenKeychain: Easy PGP and Password Store.
Exporting and importing that via a USB stick on the phone was so easy.
gpg --export-secret-key $keyid > gpgprivate.key
Only to be then greeted with:
Encountered OpenPGP Exception during operation!
The new OpenPGP AEAD Mode
AEAD is Authenticated Encryption with Associated Data which is as far as i understand it
a way to have unencrypted data (for example router header) as a part of your authenticated
message. Meaning the receiver of the message can check if the header was modified.
And there are a bunch of incompatible modes / implementations for this.
(See: https://articles.59.ca/doku.php?id=pgpfan:schism for way more details)
In summary OpenGPG defaults to a mode called OCB which is not standard and
implementations like the Android App do not support.
The arch wiki contains a good description on how to disable AEAD on an existing key.
$ gpg --expert --edit-key <FINGERPRINT>
gpg> showpref
[ultimate] (1). Foobar McFooface (test) <foobar@mcfooface.com>
    Cipher: AES256, AES192, AES, 3DES
    AEAD: OCB
    Digest: SHA512, SHA384, SHA256, SHA224, SHA1
    Compression: ZLIB, BZIP2, ZIP, Uncompressed
    Features: MDC, AEAD, Keyserver no-modify

gpg> setpref AES256 AES192 AES SHA512 SHA384 SHA256 SHA224 ZLIB BZIP2 ZIP
Set preference list to:
    Cipher: AES256, AES192, AES, 3DES
    AEAD:
    Digest: SHA512, SHA384, SHA256, SHA224, SHA1
    Compression: ZLIB, BZIP2, ZIP, Uncompressed
    Features: MDC, Keyserver no-modify
Really update the preferences? (y/N) y
(source: https://wiki.archlinux.org/title/GnuPG#Disable_unsupported_AEAD_mechanism)
Now if we already updated the key in pass we unfortunately need to re-encrypt all files again.
for filename in ./*/*.gpg; do gpg -d -r $USER ./${filename} > ./${filename}.decrypt ; done
for filename in ./*/*.decrypt; do gpg -e -r $USER ./${filename} ; done
for filename in ./*/*.decrypt.gpg; do mv "${filename}" "${filename/.decrypt.gpg/}" ; done

git commit -am "re-encrypt passwords without AEAD mode"
git clean -dfx
(source: https://github.com/open-keychain/open-keychain/issues/2096)
And tada 🎉 our key works now on Android as well.
02 Apr 2024
Since you might be not interested in me hating NixOS, Linux and the world in general i put
my little rant at the end of this article.
The first part is how to cross build a NixOS image for a Raspberry Pi 3 B+ from Fedora.
I used compiling through binfmt QEMU.
My Fedora laptop is a x86 system and we need to build a AArch64 image.
I assume that nix is already installed and binfmt is installed and works.
And spoiler / warning no idea if that is proper or a good way to do it,
it is just the way that worked for me.
$ nix --version
nix (Nix) 2.15.1

$ ls /proc/sys/fs/binfmt_misc/ | grep aarch64
qemu-aarch64

$ systemctl status systemd-binfmt.service
We need to configure nix to use this.
For this I added the following config to /etc/nix/nix.conf.
extra-platforms = aarch64-linux
extra-sandbox-paths = /usr/bin/qemu-aarch64-static
After that we need to restart the nix daemon.
$ systemctl restart nix-daemon.service
After that we are ready to create the config file:
$ cat configuration.sdImage.nix
{ config, pkgs, lib, ... }:
{
  nixpkgs.overlays = [
    (final: super: {
      makeModulesClosure = x:
        super.makeModulesClosure (x // { allowMissing = true; });
    })
  ];
  system.stateVersion = lib.mkDefault "23.11";

  imports = [
    <nixpkgs/nixos/modules/installer/sd-card/sd-image-aarch64.nix>
  ];

  nixpkgs.hostPlatform.system = "aarch64-linux";
  sdImage.compressImage = false;

  # NixOS wants to enable GRUB by default
  boot.loader.grub.enable = false;
  # Enables the generation of /boot/extlinux/extlinux.conf
  boot.loader.generic-extlinux-compatible.enable = true;

  # Set to specific linux kernel version
  boot.kernelPackages = pkgs.linuxPackages_rpi3;

  # Needed for the virtual console to work on the RPi 3, as the default of 16M doesn't seem to be enough.
  # If X.org behaves weirdly (I only saw the cursor) then try increasing this to 256M.
  # On a Raspberry Pi 4 with 4 GB, you should either disable this parameter or increase to at least 64M if you want the USB ports to work.
  boot.kernelParams = ["cma=256M"];

  # Settings
  # The rest of your config things

  # Use less privileged nixos user
  users.users.nixos = {
    isNormalUser = true;
    extraGroups = [ "wheel" "networkmanager" "video" ];
    # Allow the graphical user to login without password
    initialHashedPassword = "";
  };

  # Allow the user to log in as root without a password.
  users.users.root.initialHashedPassword = "";
}
The overlays are quite important as there is some issue
which I don't fully understand.
If not added the error looks something like this where a kernel module was not found:
modprobe: FATAL: Module ahci not found in directory /nix/store/8bsagfwwxdvp9ybz37p092n131vnk8wz-linux-aarch64-unknown-linux-gnu-6.1.21-1.20230405-modules/lib/modules/6.1.21
error: builder for '/nix/store/jmb55l06cvdpvwwivny97aldzh147jwx-linux-aarch64-unknown-linux-gnu-6.1.21-1.20230405-modules-shrunk.drv' failed with exit code 1;
       last 3 log lines:
       > kernel version is 6.1.21
       > root module: ahci
       > modprobe: FATAL: Module ahci not found in directory /nix/store/8bsagfwwxdvp9ybz37p092n131vnk8wz-linux-aarch64-unknown-linux-gnu-6.1.21-1.20230405-modules/lib/modules/6.1.21
       For full logs, run 'nix log /nix/store/jmb55l06cvdpvwwivny97aldzh147jwx-linux-aarch64-unknown-linux-gnu-6.1.21-1.20230405-modules-shrunk.drv'.
error: 1 dependencies of derivation '/nix/store/ndd1yhiy68c2av64gwn8zfpn3yg07iq5-stage-1-init.sh.drv' failed to build
error: 1 dependencies of derivation '/nix/store/j2gmvl3vaj083ww87lwfrnx81g6vias2-initrd-linux-aarch64-unknown-linux-gnu-6.1.21-1.20230405.drv' failed to build
building '/nix/store/vs0cg5kzbislprzrd3ya16n1xd532763-zfs-user-2.1.12-aarch64-unknown-linux-gnu.drv'...
error: 1 dependencies of derivation '/nix/store/gjhfjh9bb3ha0v03k7b4r3wvw4nxm7r3-nixos-system-aegaeon-23.11pre493358.a30520bf8ea.drv' failed to build
error: 1 dependencies of derivation '/nix/store/x5mnb1xfxk7kp0mbjw7ahxrz2yiv922s-ext4-fs.img-aarch64-unknown-linux-gnu.drv' failed to build
error: 1 dependencies of derivation '/nix/store/8qbjy9mnkrbyhj4kvl50m8ynzpgwmrpz-nixos-sd-image-23.11pre493358.a30520bf8ea-aarch64-linux.img-aarch64-unknown-linux-gnu.drv' failed to build
Don't forget to add your customization after # Settings.
This is the place where you setup your user, enable required services,
configure networking.
In my case that's where most of the config is from this blog post: Build a simple dns with a Raspberry Pi and NixOS.
After that we can build (this takes some time!) and flash the image.
nix-build '<nixpkgs/nixos>' -A config.system.build.sdImage -I nixos-config=./configuration.sdImage.nix --option sandbox false --argstr system aarch64-linux
and
sudo -s
cat /path/to/img > /dev/sdX
The Rant
Why am I building a image myself instead of using the official image and just do what
i have written in my earlier blog post Build a simple dns with a Raspberry Pi and NixOS.
And the answer to that is part of my rant somehow NixOS is not able to upgrade / build on 23.11
on a Raspberry Pi it crashes for my either while downloading some packages or with some pid that
either deadlocks or hangs for longer than i was willing to wait (more than 6 hours).
After I decided to try to cross build it was a real struggle to figure out how to do that.
There are a lot of resources:
And a lot of them are not well structured or outdated.
Which makes it very hard for a beginner like me to figure out where to start.
But with all this ranting i also want to point out that it seems like most
NixOS user want to help you out.
Thanks makefu for answering all my stupid NixOS questions
and nova for pointing me to the correct github issue.